Showing posts with label terrain. Show all posts

Tuesday, October 9, 2018

Milliput is my friend - GW Balrog work

Feed me hobbits!
This week went to town with the milliput on the GW LotR Balrog figure.  So much milliput.  Part of this was because the figure had been broken apart and bits had been snapped off, especially around the wings.  Part was because of the usual GW approach to cutting up figures for the molds.  No hidden joins under overhanging sculpted details to make things clean.  Nope, been spoilt there with new resin figures.  Just the good old 'slice off the pieces' and let the buyers fix up the joins.

Wings after glue
I pinned (using chopped up paper clips) and superglued (with Zap-a-gap) all the pieces together.  The arms were the easiest as they had sockets.  The wings originally did but the inserts had been snapped off and were still in the figure.   So drilling and pinning there.  The back flames had tabs so they didn't need pinning.  The head had nothing, just a smooth join so pinning was a must there.

Wings after putty work
...and some more putty


Original base glued inside the new resin base, pre milliput
For the base the figure came with a 60mm flat base, totally different from the usual GW lipped bases. So I went off to The Combat Company and got a 60mm resin base.  I glued in the plastic base inside to add some bulk and used more milliput to hid the edge gap.

Love this barn
I also put together the Renedra barn and have now glued this onto a piece of 3mm mdf.

Reaper Fire Giant
Finally I put together the Reaper Fire Giant.  Only one tiny seam line to fill in on this one :)


Monday, August 13, 2018

54mm Andrea Teutonic Knight (FP-2) part 2

Teutonic knight of colours
So lost a weekend to moving the parents.  On the other weekend I got the cloak on the Teutonic Knight sorted out.  Trying green and having limited success.  My main issue is that I seem to have streaks/lines in the paint.  I'm thinking this is from the JS paints being a bit thicker.  However I haven't had this with others so maybe it's just the Pthalo Green?  The cloak colours were

base - Pthalo green + yellow oxide
up - green and yellow ink, with more pthalo green added
down - base + violet mix from the JS Ultramarine Blue and red ink.  Random shades using the base + ultramarine blue for variety.


I did try using white to highlight the green but that (as expected) chalked out the green.  I also found that adding yellow made a much more dynamic highlight over the white.  Really added shine to the green over lightness (aka whiteness).

For the three shadow folds the wife suggested making them each a different height (originally two were roughly the same).  This added greatly to the dynamics of the cloth.

I'm not sold on the green to be honest.  It doesn't sit right to me.  Perhaps it's just too much, or maybe needs some texture on it?

28mm bridge


Second up was adding some flock/scatter to the bridge to make it look a bit more run down.

fix up time


Finally started to fix up a Celtic bust I purchased awhile ago.  The figure came with a left hand instead of a right hand.  So I cut off the fingers and thumb, glued on the hand stump and started to sculpt new fingers/thumb and fix up the sleeve.  For the sculpting I used a mixture of green stuff and standard milliput.

Sunday, July 29, 2018

54mm Andrea Teutonic Knight (FP-2)

Andrea Teutonic Knight (FP-2)
So my 1-1 scale terrain project has finished up so I'm now able to get back to some painting finally.  In the queue for some time was a 54mm knight with a spear (Andrea FP-2) that I purchased off eBay.

Although a Teutonic knight I wanted to do something different to the usual white as I've got a few other Teutonic figures in the cupboard.  Sorry Mike Blank.  So after much head scratching I went for a tradition(ish) blue/yellow scheme with purple highlights and green (at this stage) on the cloak.  I also wanted to try using the mixtures of two of the main colours to help shade the third colour.  Ie mix blue/purple and use this mix to shade the yellow.


For the blue I used JS Ultramarine Blue as the base, shaded with VMC Dark Sea Blue and highlighted with white and Cerulean Ink from Liquidtec.  I also added some of the base blue back to the mix to stop is chalking out so much.  It has become rather dull but I think that matches the fabric look I am after.  I may also do some dust/stains on the bottom of the cloth area later.  I did try and use the purple (see later) in the mix but that ended with the blue being too violet.


For yellow I used JS Yellow Oxide shaded with a mixture of the light purple used else where and some VMC armour brown.  Basically a very slight darker orange.  I was trying to use the secondary colours from mixing the primary colours of the figure in the shading to have some colour harmony.  Highlights with white, VMC Light Yellow and VGC amarillo yellow ink added to keep the colour intensity.  Really starting to like using inks in the highlights.

For the purple I make a mix of Liquidtec Dioxazine purple (a very dark purple) with white added to make a light purple.  The horns use this as a base and the horn tabs are this colour neat.

Originally I was going to paint the cloak in the purple but it didn't work.  Instead I swapped to a dark green (complementary to the blue/yellow) which helps the tunic pop some more.  More of that to come.

The armour was just the usually black undercoat and then some very gentle dry brushing in metallics and shading with dark sea blue and violets in the shadow areas.

On the rear of the figure the unpainted tab is some milliput that I added to give the cloak something to rest on and stop is sagging while the glue dries as the original fit wasn't that great.  I do have concerns that during gluing the cloak will sag so may also pin this.

28mm bridge painted with oils


Also painted up a 28mm bridge I purchased some time ago.  I used a technique of using oil paints smeared over a light brown acrylic base to represent a wood pattern.  Now need to add some dressing (plants, etc) and clean up some of the highlights.  Really just and excuse to break out the oil paints.

Terminator Genisys human


Finally finished the two Terminator Genisys figures.

...more humans


Monday, July 16, 2018

Orphan 9 kickstarter figure and more interruptions to painting

Orphan 9 kickstarter figure
So over the last two weeks I finished off the Orphan 9 figure.  Really liked her and I was pretty proud I managed to do her tiny face.  From a distance the green of her jumpsuit pops out from the dark red/brown of the wall.

All done
On the purple originally I wasn't happy with it so I toned it up a few levels which helped out.  The sword hilt I did in bright red to make it a bit of an accent.

More hills
Next up was finishing off a resin piece of terrain I had in the box.  Slowly cleaning out these pieces I have.  Not playing anything at the moment (and haven't for some time) but in a few years the kids will be ready.  At the moment every few months we get all the terrain board and pieces out and make villages/etc and race horses cars around the board.

Toothpick tools
For sculpting/modelling I picked up a tip (from a Bill Horan book I think) about using toothpicks coated in superglue.  I made up a few more by using the cheap and nasty superglue and sanding back with 400 grit sandpaper between coats.  Three coats later you have some very hard sculpting tools.

Starting some Terminator Genisys figures
Started another two Terminator Genisys figures.  This time I'm experimenting with sand (think old choc-chip camo) camo uniforms.  I like the idea that the human forces are a miscellaneous band of various soldiers, hence the different uniforms.  Plus it's better than painting 16 figures in green.

...now to add the flock and scatter material
However most of my time was spent on some 1-to-1 scale terrain projects.  Plumbing issues meant the entire back yard was dug up, so now it's time to level out the ground, truck in some turf underlay and spread it out and then lay some new turf.  Not what I wanted to be spending time on the be honest.

Monday, April 16, 2018

Terminator Genisys and some terrain

So spent the first bit of the week tidying up the 3 eyed alien bust.  Nothing major, just some so touch ups and fiddling.  I seem to do this every time.

Terminator Genisys figure
Next was a couple of Terminator Genisys figures.  Tried going for the black/grey tactical look on these two.  I've decided painting grey is pretty dull.  Six human figures done, ten to go.  Really need to get through these so I can say they are done (bit of OCD there) and move onto all of the LoTR figures I have waiting...

Terminator Genisys figure
While in the shed painting up the new cosplay shield for the wife (putty and undercoat done, started the main colours) I went through my box of resin terrain and pulled out a piece to do.  This one was from Fernvale Scenics.  I just like to do terrain pieces every now and then.  Not really playing miniature games any more (other than Dungeon Saga with the kids) but I still like doing these.  I'm thinking a few more years and the kids will be ready :)

Paint work done

For the rocks on this piece I started with JS Raw Sienna and shaded up with Cadmium Mid Yellow and then Warm White.  I did this in as a mixture of layering and then some dry brushing to ease the transition between layers.  The shading was done by adding in some VMA Armour Brown.  A great brown/purple colour.

Sorry kids, no lunch boxes for you...
I then glued on various scatter to the base with PVA.  The key is to make it random which can be harder than it seems.  You mind naturally wants to do things in an ordered way.  I went for a darker scatter near the base of the rocks and a lighter scatter further out.  I label all my boxes of basing materials with the name from the packet.  This way I know exactly what I purchased, hence names like "Field Balk".

Scatter applied
Once the scatter was done I let it dry and then applied a very watered down layer of PVA over the top.  This bonds with the previous layer and makes the scatter rock solid.  No more scatter dandruff after the game.  Next will be adding some vertical variation with static grass and grass tufts/flock bundles.


This week will probably be shield work so hopefully will get that well underway.

Sunday, April 8, 2018

3 eyed alien bust and a bridge

Got sick over the long weekend so didn't get up to much.  I spent most of my time making a costume shield for the wife.  Maybe more on that later when it's done.

54mm horse with a whole lot of putty
The first block of time was on the 54mm horse I'm thinking about using for the knight.  This horse needed a lot of work.  Putty and filing on the joins (the 2 halves and a head).  Also there were mould failures on the head and leg (ie areas where there was a large step) which needed to be filled.  Finally there was no tail provided so that had to be done from scratch.  Very much an old school figure.

For the tail first I glued in a paperclip and made up the rough bulk with milliput.  Then I used used a milliput/green stuff mix for the tail but after an hour the end result was terrible so I just scraped it all off.  The second attempt with just green stuff worked a lot better.

Bridge from Corsec Engineering
I found a $7 28mm bridge at my LGS from Corsec Engineering.  It's a mdf flat pack with two acrylic rods for the rails of the bridge.  Due to the curvature of the bridge I used my heat gun to soften the plastic rods and form it into the curve of the bridge.  Then I glued it together and used some wood filer on the gaps.  The bridge planks are made out of a single piece of thin plastic card which is quiet a good solution.

Finally I did some painting on the 3 eyed alien I purchased from eBay recently.  Seem to be suffering from painters block currently.  Want to do some pieces, but just can't get the brain into order.  Luckily things came together over the weekend and I got this piece going.

Paints used


As per the picture I had a pretty limited palette due to the limited number of features on the figure (skin, scars, eyes and some odd strap thing).  I really wanted to try yellow in a large piece.  After about an hour I was pretty close to dipping the figure in paint stripper.  The Cadmium Mid Yellow is very intense and was making it very hard to redo areas as they would end up too yellow compared to other areas already painted.  Everything was getting very patchy.  However I just kept painting and hoped to come out the other side.

Original colour scheme
Once I did the eyes the figure suddenly came together.  I found compared to my original paint trial I used a lot more purple in the shading.  Also I used some of the blue in the shading (to take things into a more green shade) later on to add some other colours.  I tried again to do more contrast with the light source from the top left.  The scars I did in a very dark brown/purple.

3 eyed alien
I'm not sure what the strap is.  It looks like a strap but just ends at the collar bone.  I used Armour Brown as the base for this.  The sculpt has the strap very cracked so I went with that.


I want to have another go on the right eye socket area as it doesn't quite match the left.  Also the back probably needs some more work.  Throughout I kept fighting the yellow as it was so intense.  I usually added some warm white and hexed lichen to tone it down and then in some cases used some yellow ink in a glaze to get the yellow back.  Yellow isn't something I paint with as a base usually :)  However I am happy with the result so far.

Monday, February 5, 2018

28mm Village house ruin building

A year in review
Well I lined up all the display pieces I had done over the year in chronological order to give myself a nice snapshot.  Although the painting on the later figures is better my favourite piece is still the Anonymous bust by Banshee.  I'm struck at the difference between it and the earlier Viking bust.  Also in this last year (since Cancon 2017) I've painted more display figures than the last three years combined.  At least I'm getting quicker.

While I think about painting things I started on the 28mm "Village house ruin 2" that I purchased at Cancon from Battlefield Accessories.  For $14 it is a really quick way to get a nice basic structure of a building to add some details on.

When working on mdf buildings I've learnt a few things over the years.  First it to unwrap the building and let it air for at least a week in the shed.  That laser cut mdf is seriously smelly.

I use PVA glue to put together all my mdf buildings.  Previously I would try and slap together the entire piece in one sitting.  Then I would get annoyed as the whole building would dry all out of square.  Now with the wisdom of the ages I've slowed down a bit and try to do things a bit better.

Floor piece glued to the base


This building comes with a floor so I glued that to a base that I cut out of some scrap 3mm mdf.  I chamfered the edges of the mdf base as well.  Previously I would leave the edge straight for extra strength but it doesn't really make a difference I found.  Once the floor was glued down I flipped over the base and coated the underside with watered down PVA.  This adds a lot of strength to the base and seals it up nicely.  I usually do two coats and sand with 400 grit between coats to get a really smooth surface.

Clamp time


For the walls I used the old method of lego blocks to make right angle pieces to clamp the walls to.  This ensures you get straight walls every time.  Just make sure you wipe up any excess glue before clamped as the PVA will stick the lego to the mdf.

Love the 90 degree lego


Next up will be adding some ground texture (sand/rocks/etc) and then undercoating the entire piece.  I plan to add some extra rubble/wood too but will probably add that after I have painted the walls.  Otherwise I will be trying to paint the walls around the rubble.

All ready for the next step

Monday, December 4, 2017

Reaper Spirit of the Forest part 3

Spirit of the Forest
So this week was the rest of the wood on the figure and the core the the greenery done.  I also started to work on the OSL from the eyes of the figure.


For the greenery sections my base colour was JS Sap Green and a touch of Burnt Sienna (to blend it with the wood).  Shading was done by adding in JS Pine Green, Red Earth, Pthalo Green, VMC Red and black.  Highlights were done by adding in Cadmium Yellow Mid, Warm White and White.

For the recessed areas of the greenery went for more of the Pine Green and Pthalo Green.  For the darker areas I used more of the red and black.  Mid level highlights were done by adding the yellow, upper highlights by adding in white.


I also did some of the mushrooms in various colours to add some variety to the figure.

For the OSL I used white and Liquitex Lime Green ink on the eyes.  This was diluted heavily with water/flow aid and glazed on the jaw, eye area and on the two fists.  Pretty much did an straight line from the eyes and where ever that sight line hit the figure I added some glaze.  I now need to got back and add some higher level highlights closer to the eyes.

On the base I painted up some of the grass area and painted in the pond ready for a clear resin pour.


Finally I did a bit of work on the Terminator Genisys terrain piece.  It's way too dark (really should have base coated in a much lighter grey) but I'm happy with it.  I played around with trying some rust colours.  I started with a dark brown and went up to a light orange.  I also tried the AK Rust Streaks which I blended with some white spirit.  That worked pretty well.  Just need to finish painting the ground around the base to all this one done.

Monday, November 27, 2017

Reaper Spirit of the Forest part 2 and Terminator Genisys terrain

Spirit of the Forest
So I slacked off big time from painting.  On the plus I watched two seasons of "The Expanse" and most of Punisher season one.  I now however have a very strong urge to scratch build some spacecraft.  Also my shed is cleaned up and has some new shelving.  Also the cosplay sword I'm making for the wife finally got going again.  Too many projects.


Getting back to the Spirit of the Forest figure I've done the wood layer on another leg and both arms.  I kind of forget that I had the Red Earth in the base and went for a mixture of Burnt Sienna, Raw Sienna, Indian Yellow? and White with a touch of red at the end of the highlights.  Shading was done by starting with the base and adding Pthalo Green, VMC Dark Sea Blue and Black.

Rather than do the green parts as I complete each limb I decided to just get all the wood done.  On the left arm I found I had gone too far with the highlights so need to bring that back a few notches.  Do do this I did a few light glazes of the base Burnt Sienna over all the arm.

For the eyes I added some Pthalo Green to the mixture and highlighted by adding in more yellow and white.  My intent is to do some OSL from the eyes (yes - very standard but my first attempt at OSL).  Also on the fists I have done some glazing in the green mixture on where light would hit if coming from the eyes.


Finally while cleaning out the plastic scrap bin in my shed I came across a few pieces that I though could make some good modern terrain.  The base was the holder for a router bit and the tubing is from a CD spindle holder.  I'm going for a ruined comms/power tower look.  I super glued the tube to the base and put a wooden dowel inside the tube to fill up the space.  Then milliput standard was used to fill in the gaps.  I stripped some insulated wire and used the copper wire pieces to stick out the top to represent some broken rebar.  Next will be coating the whole think in Vallejo stone paste which I'll sponge to get a rough concrete finish.

Monday, May 22, 2017

Milliput is my friend

So a week of bits and bobs.  With my two new busts I wanted to get them ready for painting in the future.  So this meant time for the putty.  In the end it needed two goes to get all the holes filled.
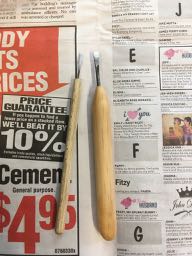
Home made chisels
Firstly I trimmed down all the mold lines on the busts.  My new micro chisels I made recently worked great.  Rather than trying to scrape a mold line (very hard across hair for example) instead I could just cut off the line straight on, a small bit at a time.  The little 2mm chisel was great.  Wish I had made these years ago.

On the large roman figure there were a number of small holes/negative bubbles to be filled in.  On the back of the figure an edge had been broken off (about 4mm x 1.5mm).  This also had some stitching pattern on it so after I had built up the area I got a second thin roll of putty and lay it down and then put in the pattern.

For the smaller celtic bust there was a major negative bubble at the bottom of his cloak.  There were also a few gaps between his arm and body.  Finally on his helmet the edge banding was missing from approx 25% of the rim.  Some very thin putty and deep breaths were needed to get that fixed up.  It’s very hard to get the putty to stick on initially when it is that thin without squishing it down flat.

For larger scale figures (like busts) I prefer to use Milliput (standard) over Kneadatite aka green stuff.  As Milliput goes very hard it can be scraped and polished.  This is essential for repairing a cloak for example where you need to have the repaired putty section as smooth as the other adjacent areas.  After putting on Milliput to an area I first smooth it down with a sculpting tool.  Once the area is looking right I then use a damp paint brush to remove any tool marks.  After the Milliput is dry I then will usually scrape the area (if possible) with a scalpel blade.  I also make sure I scrape some of the surrounding resin area to ensure both the resin and the Milliput are the same level (i.e. no step up/down).

For smaller areas I like to mix Milliput and green stuff 50/50 as is easier to work with but goes reasonable hard unlike green stuff by itself which stays very rubbery.

Preshaded figures
I undercoated/preshaded all the Terminator game figures and both the busts in the usual black then white highlights.  I was thinking about spraying the terminator figures with a metallic coat but decided that to get full coverage of the figure I would end up loosing the preshading as there are a lot of nooks to get the paint into, which means a number of spray coats to get them all.

For the busts I drilled out a hole in the bottom for mounting.  I need to work out their bases next so I can cut and glue in the right size of brass rod.  I don’t like to be gluing and measuring up bases once the bust is painted.  Late in the weekend I went and got some more wood from the hardware store around the sizes I think will work.

Underground entrance

Tunnel entrance

Rough ground scatter
I did a bit more work on some pieces of spot terrain.  Two underground entrances and a small area of rough terrain.  I think the rough terrain may end up being for LotR or Saga.

More troll love, with pre shade highlights
Lastly did another Dungeon Saga troll.  Only two more to go then the base set is all painted :)