Showing posts with label El Torres. Show all posts

Sunday, January 18, 2015

Degra El Torres is done

Almost like a real one
I made it, with just under a week before Cancon (although the last two weeks were pretty easy).  It was just the last few pieces done this week.  First a light varnish with Vallejo Matt varnish.  I use an airbrush to do all my varnishing now and can’t recommend it enough.  No more rattle can and speckled finishes and frosting from old cans.  Also $5 for a small bottle of varnish is a lot better than the $25-30 for a spray can and lasts longer.


Once the varnish was done I did some more dust work on the boots and lower legs with some pigments to add to the dust washes already done.  I also added some more rust pigments to the tongs.

Unable to stop fiddling I redid some of his face, mainly the forehead.  It just was a bit too plain.  I’m not 100% with the result but had to stop as things are getting lumpy due to all the repaints done.


Then it was on to gluing.  I used PVA glue for the smaller items and polystyrene glue to attach the figure to the modelling foam.

Lastly was the brass plaque.  After a few nights of playing around with the Dremel and some brass strips I was getting better at engraving, but not good enough.  The low quality of the engraving would be a bit distracting to the overall finish.  So off to Mister Mint and $20 later I was all done.  This makes the plaque cost more than the rest of the piece combined.  I also found Mister Mint have gone high tech and don’t do the engraving by hand.  Instead they have what I assume to be a little CNC machine which they just type in the text, select the font and size of work piece and everything is done by machine.  Great of the end consumer but a little sad as one more skill is lost from the workforce.  I glued the brass onto the wooden base with some two part epoxy.


I’m a bit out of sorts now.  Happy El Torres is done, but still wanting to do better.  I have a number of other things to look at (finish the Doom figures, some figures for Saga, 1/35 scale german AT gun, the banshee bust, 54mm Pegaso figure) but I think I will wait until after the painting classes at Cancon to see what to do next.  Maybe some 28mm Saga figures just to keep things ticking over as they are pretty easy to do.

I also have to consider do I keep doing two streams of painting, one ‘churn and burn’ army stuff and the other high detail work?  But the army level is starting to loose it’s appeal.  I feel I’ve painted enough armies and maybe will just finish off the few remaining ones I have (LoTR elves, few saga bits).  Mind you I said that a few years ago when I was coming to the end of the LoTR figures and then went out and purchased two armies for the then new Saga game.  After all everyone knows that you die when you paint your last figure.

Sunday, January 11, 2015

El Torres near the end

Ready for a display base
Bit of a quiet one this week.  There was some fiddling around on El Torres as I redid the spot highlights on the front breast plate armour (again) and smoothed out the shading transitions.  After reading one of the painting guides in issue 20 of Figure Painter Magazine (a great magazine) I added a 5 o’clock shadow to the face.  I also added some black washes around the rivets on the armour to try and make them stand out a bit more.


All this fiddling did however result in a few mistakes that then took almost as long again to fix up.  So I’ve pretty much had to say no more so I don’t ruin things.  However what I would really like to do is varnish the figure and then start playing with some oil washes.  My intent was to do a trail figure before El Torres and the Pegaso figure I have but with time constraints and trying to get something ready for Cancon I had to go with El Torres off the bat.

Ready for a figure
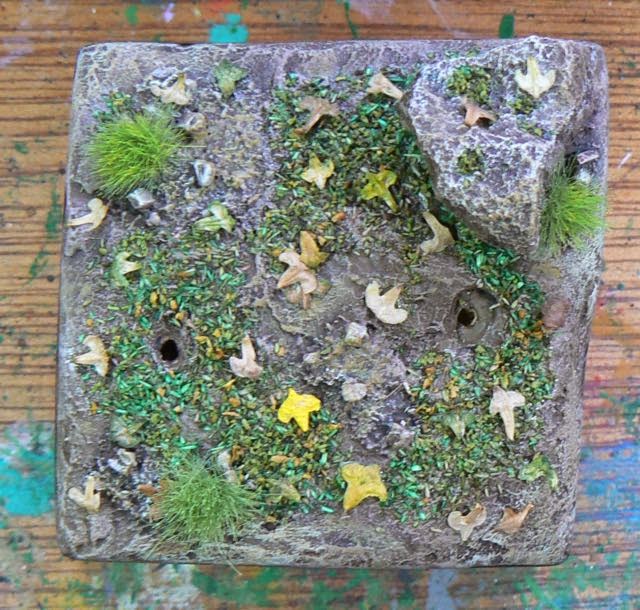
The base is also finished.  I added the extra grass tufts and painted those.  I also added a few birch seeds acting as leaves.  Insanity is gluing individual leaves and taking serious consideration to the orientation of each leaf.  The old days of PVA glue and dip in flock are gone.

Those leaves never seem random enough
So what is left?  Just a light varnish coat and to glue everything together.  Due to rainy weather I didn’t get the varnish done this weekend so that will be next week.  Then the glue together of all the bits and final photos :)  I already have a carry case (actually an old baby milk powder tin) sorted out and have predrilled some holes in the bottom of the display plinth to attach the whole piece to the tin.  That way it can safely be transported.

Sunday, January 4, 2015

Small scale diorama work on El Torres display plinth

This week I concentrated on getting the display plinth underway as Cancon 2015 is only a few weeks (and more importantly a few weekends) away.

I started by gluing on a square piece of foam on top of the plinth and left it to dry overnight.  Then I rough outlined what I wanted the shape of the ground to be like and carved/hot wire cut away the foam until it was near to what I wanted.  Following this I sanded down some of the bumps to get the contours smooth.

Carved foam and rock glued in
I had previously experimented with different coverings for foam (plaster of paris, polyfilla, plaster bandages, texture paste) and went with polyfilla.  I wanted to get the sides of the foam very smooth so when painted you wouldn’t see any bumps or lumps.  Also I wanted to protect the foam from getting dented when handled.  Since you can sand polyfilla and it is flexible (an issue with plaster is that will crack easily on thin coats) it seemed like a winner.  So a few coats and some 400 grit sand paper and the sides were looking quite nice.  I made the top quite rough to simulated the ground texture.

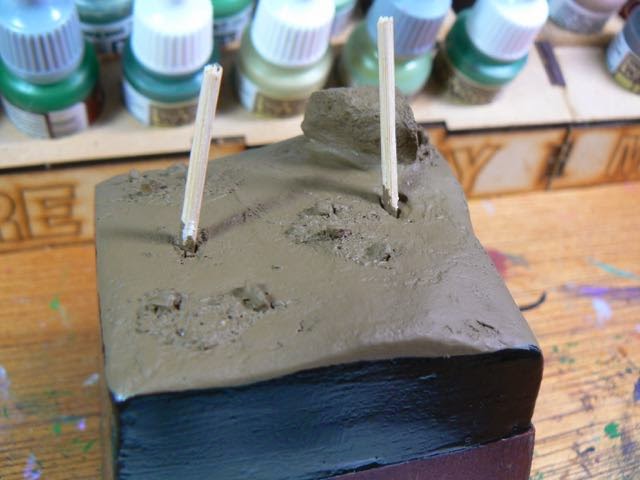
So black - the sticks are where the figure will go
I originally painted the side in a flat black, but the minor imperfections in the surface showed up.  Luckily my old Reaper Gloss Black paint was still usable and that comes up a lovely finish.  3-4 coats and you have a great even semi-gloss finish that hides all the bumps in a flat surface.  Doing things a second time I would have just boxed in the foam with some plastic card and painted that.

For the terrain originally I wanted to have a small broken column (which the shotgun would rest on) which I wanted to paint in a sandstone like effect.  However due to the rough texture on the column (which made doing washes impossible) and my lack of skill I just couldn’t get what I wanted.  Perhaps a few more tries with the airbrush and really thin layering might have got there but I just was burning too much time.  So instead I grabbed a rock from the garden, clean it up and glued in in place.

Most of the dry brushing done
The colours are my usual 28mm basing ones.  VGC Earth washed down with AP Strong Tone.  Then a few layers of dry brushing with VMC Pale Brown and VMC Iraqi Sand mixtures.  On some bits I went up a lighter shade with the Citadel Bleached Bone.

Once the colour was set I added some scatter material and some grass tufts.  I still need to paint the grass tufts as real grass isn’t a uniform colour.  You need to add some yellow/bright green/brown normally.  Also I will add some leaves and perhaps a few reeds pretending to be high weeds.  The key is to add lots of diversity and height diversity just like you see in the wild.

Scatter and grass added
Once all the ground pieces are done it will be time for final alignment and varnish time.

Sunday, December 28, 2014

Large scale diorama finished and much painting done (of sorts)

Well luck was with me and I did get to do more paving work, but on Christmas eve.  I did the mortar work on Christmas day however.  Then a rest day on Boxing day and onto assembly of $800 of Ikea furniture and two clear coats on all the wooden bits (with the wife helping out so the job only took half the time).  So much painting was done, but most of it was with a 2 1/2 inch brush ;)

So nice now the blood and sweat is washed away
Sometime in all that we had Christmas and I routed out two table tops which are next in the pipeline.  But apparently this blog is about miniature painting too…

Given the time constraints I targeted a few small areas.  First off was the shotgun, which I’m 80% of the way there.  Happy with the result so far.  I will have the shotgun with the hammers facing the ground to try and hide the fact the piece was miscast and only has one hammer.

Two barrels, one hammer.
Second was the start of the dust work on the boots.  I did a glaze of AP Desert Yellow followed by a mixture glaze by adding some VGC Earth until a final glaze of almost full VGC Earth was done.  I will be using pigments to finish off the dusting but will do that just before the varnish coat as pigments are too messy to be hanging around for long.

Dusty boots
I also used a much reduced version of the first dust glaze on all the armour to give it a bit more depth (and less shine).  The result was very good.  The shine is gone, but the highlights and shadows are still there.  Also a few bumps and hollows have been picked up and in all the armour is finally getting to what I want.  Took a long time but I’m no longer worried about the armour finish.

Ammo and armour
I also finished off the ammo belt front and did each of the shotgun shells.

Yep, that doesn't work at all
Lastly I had another go at the puffy right top sleeve.  I just can’t get what I want and the few attempts so far just don’t tone with the rest of the figure.  The colours grate.  I tried some yellow on the deep recessed parts of the sleeve but it came out much too bold.  Just going to have to try something else there.  Failing that it’s time to cut my loses and go total repaint.

Sunday, December 21, 2014

More armour shading and large scale diorama work

Get me painted!
So the never ending quest for metallic shading continues on El Torres as I reworked his entire front breastplate another two times.  Just can’t seem to get what I’m after here.  The full bloom effect is now gone thankfully and I’ve reduced the spot highlights down to two small areas on the middle part of the breastplate.

I’ve also cleaned up the face a little and starting detailing up the ammo belt that he wears across his chest.  I think I’m going to have to stop working on the armour otherwise it will end up death by a thousand cuts.  Plus the more you fiddle on a figure, the more likely you end up with a mess of lumpy paint and inconsistent shading.

Rusty tongs, wood post optional
I’ve also painted up the rusty tongs.  The rust was done by painting on brown and then orange spots and then used pigments (red oxide, dark ochre) over the top.  I plan to varnish the tongs (to seal in the pigments) and then I’ll do an oil wash over everything.

On the Doom side I finished the six Hell Knights.  They are now waiting for a varnish before being put back in the box never to be used again :)

Just like a real one
Also I stained and varnished the display plinth.  Next step is to add some putty/clay/something to the top to make the ground level for the figure.  I might even use the modelling foam I have as that is very easy to work and not as messy as clay.  Good thinking Batman.

Road base done, just add sand, pavers and sweat
I had hoped to do a bit more but I’ve been working all weekend on a large scale 1:1 diorama.  Many trips to the hardware store and much shovel work was involved.  If I’m really lucky I’ll get to do some paving on Christmas after lunch.

Merry Christmas to all and I hope Santa got all your letters.

Sunday, December 14, 2014

El Torres and display plinth

As usual a few different painting streams going on this week.

Firstly the Doom figures are moving slowly.  I’ve finished the shading on 5 out of 6 Hell Knight figures so may be able to finish them all off next week.

Getting tired of being on this stick
Secondly I worked on the breastplate and shoulder pad of El Torres.  I’m pretty happy with the back, but I’m thinking the front is too clean and shiny.  I need to add some damage wear to make the whole thing look more realistic.  At the moment he looks like he just stepped out of the buffing machine.  I also cleaned up a few mistakes where I had missed with the brush and also tidied up his left eye.  I still need to clean up a few marks on his face where the blending isn’t good enough and you can see the different colour lines.

Hello Mr Hell Knight in the distance
Since the photos I have also worked on this ammo strap at the back and the smaller straps on the knees/elbows that hold on his armour there.  My dark to light mix there was

VMC German Black Brown
VGC Earth
VGC Khaki
VMC Iraqi Sand


Thirdly I’ve started working on the display plinth.  Originally I was going to use a rectangular piece of pine but changed my mind when I saw a raw wood lounge leg in Mitre 10.  These legs are the kind that screw into the bottom of your lounge and can be stained to suit.  Not sure how you would loose a lounge leg in the first place.

Traditional Cedar stain test
I removed the screw, plugged the screw hole with a piece of dowel that I glued in and reduced the height by approx 1/3.  With the wood that was removed I did some test stains/paints.  I tried enamel satin black, a Japan black stain and a “Traditional Cedar” stain.  The picture is with the traditional cedar with I think looks the best.

So next week will hopefully be more Hell Knights, armour damage on El Torres and starting the diorama extras (gun, cup, tongs) for El Torres.  Also I need to go back and have another try on the sandstone.

Sunday, December 7, 2014

Weekly update


Still grumpy

This week I’ve been continuing on with two streams of painting.  First off I’m working on some more of the Doom Hell Knights at lunch time fixing up the shading.  I have the first figure I completed as a guide and am slowing getting through the figures.

Secondly I have started the metallic shading on El torres.  I’ve done the knee pads, elbow pads, gloves and lower armour skirt so far.  I’m pretty happy with the progress as there isn’t any big obvious line of black paint in the shadow areas but instead the shadow areas just look darker.  I can’t paint this at night as the lights reflect too much of the metallic paint.  I need some natural light it get the highlights right.  My dark to light paint mix is

VMC Black
Citadel Blotgun metal (old range)
Citadel Chainmail (old range)
VMC Silver
VMA Aluminium

The aluminium is used just for the extreme edge light bloom as it really pops.  So next daylight session I have I’ll finish off the breastplate and top shoulder pad.

Knee pad action
I’ve also started making notes on all the mistakes I’ve noticed so far, e.g. where I accidentally brushed some metallic on the pants.  That way I can have a clean up session and not miss something which I saw one day but forgot/didn’t see later on.

These are slightly smaller than Vallejo bottles
I have a number of old Citadel and Reaper paints that are slowing drying out.  To extend their life and increase paint density on the desk I purchased some paint dropper bottles off eBay (20 15ml bottles for $5) and decanted the old paints into the new bottles.  I also purchased another Miniature Scenery dropper paint rack from The Combat Company as well.


While at The Combat Company I picked up a copy of F.A.Q 2 from AK Interactive.  300 pages of AFV painting and weathering techniques gold with great quality pictures.  Looking forward to reading this.  I also got some complementary glow in the dark dice.  Cool but pretty silly unless you play games under a black light :)


Sunday, November 30, 2014

El torres and Doom figures update

He should really wipe
Over the last week or so I’ve been working a few projects.  First up is the slowly progressing Doom figures.  The Mancubus figures have now had all their base coats done.  I decided to use some of the various metallics I have as painting mainly Dark Ages figures you don’t have much need for metallics outside of chainmail.  Plus the paints are all starting to go hard.  With all the base coats done I experimented with a coat of AP Soft Tone.  I will probably go for another layer of either strong or dark tone on the gun arms.  Then the final highlights.

Hard to pick your nose with those hands
For the El Torres base I have some broken column resin pieces (from Secret Weapon) which I though would be more interesting than the original table idea.  I have about a dozen pieces (they came in a set) so I tried a few different marble type effects.  However the columns are not smooth, but rather very coarse.  So all the heavy wash technique most people use for marbling didn’t really work.  The washes kept running into the cracks.  Instead I might try and paint them as sandstone which would suit the texture of the column better.

The un-shaded armour looks quite bad now
On El Torres I have been working on his face, collar (last week), pants, boots and shirt (this week).  The pants have worked out very nicely and I’m quite happy with the result.  My dark to light colours were

VGC Beasty Brown
VGC Leather Brown
VMC Golden Brown
VMC Tan yellow

For the purple socks I used

VGC Black
VGC Hexed Lichen
VMC White

The pant studs were done in Citadel Gun Metal.


For the boots/shirt my dark to light colours were

VGC Black
VPA Shadows Flesh
Citadel Blood Red (the very old tall hexagonal bottles range)
VGC Orange Fire
VGC White

For the green shirt puffs I’m not 100% on them yet.  The silver buttons don’t work.  Colours were

VGC Black
AP Angel Green
VGC Dark Green
VGC Sick Green
VGC White

I might try and redo the silver in a gold to tie that area back to the pants.

The face was

VPA Shadow Flesh
VMC Medium Fleshtone
VMC Dark Flesh

The collar was Citadel Bleached bone shaded down with VGC Earth and highlighted up with white.  All those frills and folds took a long time to get done.  I did the face first as I needed that to be right before going further.  If the face is wrong on this scale, the rest of the figure is pointless.

So now I have the ammo strap and the armour to do.  I think I will do the smaller arm and leg armour pieces first to see if my chosen technique works in the larger 54mm scale.  Plus that large breastplate is intimidating me a bit.

Sunday, November 16, 2014

Doom figures and El Torres

Mancubus needs some Fitness First time
Been a quiet week on the painting front.  I started on the six Mancubus figures from the Doom boardgame late in the week after undercoating the figures and doing some preshading.  So far all I have done is the basic flesh and the start of the details (guns, claws, nose).  I went for a light green/grey look which I then highlighted by added more grey and white to the mix.  All these colours were airbrushed to save time as the figures bigger than a normal 28mm figure.  Hopefully over the next week or so I will finish of the base colours and start the washes.

The big belly undead
The Doom zombies were finished off.  These were another quick and dirty "three colours with washes and highlights" job.  For the twelve figures I did 4 each in blue, brown and green jackets just to add some variety.  Even on Mars you need safety orange stripes on your clothes :)


After staring at El Torres for the week I finally got started and got the base colours down.  The green will change as the current green is just the under layer as the final green I want to use doesn’t work over white.  It’s just too thin.  The armour also just has the black preshade so far.


Using a similar scheme to my recent Wood elves I put down all the initial colours.  I find I need to have all the white covered before I start painting further.  I see a lot of online pictures where other painters work on one part to completion and leave the rest of the figure undercoated.  I find that  throws off my colour sense (what little I have).  Just too orderly in my ways.


I’m pretty happy with the colours and really like the light purple next to the golden brown on the legs.  I might change the boots as they are the same colour as the shirt which may be too much sameness in the figure.

In parallel I will also been thinking about the base.  My initial plan is to make a diorama where he (El Torres) is next to a table or something similar with some food on it and his shotgun is resting on the table as well.  Like he is waiting for someone, but waiting in the open.  His facial expression is one of world weariness and I want to align to that.  I recently got some 54mm scale food items and plates which I think will work well.  Of course it’s going to help if I get the figure finished first.

Sunday, November 9, 2014

True Metallic Metals (TMM) tests and El Torres by Degra.

After my NMM test piece I wanted to try out TMM (True metallic metals) or to put simply painting metallics with metallic paint, but with shading.

Old school flat pack figure
My first test piece was an old Julie Guthrie Grenadier figure.  A fully armoured knight so lots of metal there. Originally I was going to use VMC metallics but found the mica/sparkle particles in them to be quite visible in the VMC Gunmetal (72.054).  Remembering I had the army painter metallics (I had won the complete Army Painter range last year) I got them out to have a look.  I found them to be excellent.  So smooth in colour.  Much better than the rest of the AP range which I find to be rather thick.  The only negative was that there wasn’t a huge differentiation from the dark Gun Metal to the light Shining Silver.  To add to the colour spectrum I also purchased VMA Black Metal (71.073) and VMA Aluminium (71.062).  However I still find the VGC Silver to be brighter.

I base coated the figure in AP Gun Metal and shaded down with the Black Metal and all the way up to VMC Silver.  I got a really nice smooth transition especially on the larger shield.  However all that shiny metal means you don’t really see the difference.  In 28mm the paint job looks better than the usual paint/wash/dry brush highlight but not by much.  There is just too much light reflection.  The lower the light the better you can see the blending from near black to silver.  But in normal light not so much.


The feet are a bit miscast
 My second test piece was from Eureka and their Conquistadors range (part 100CON01).  Originally I went for a very heavy black lining over most of the figure.  That was too harsh and I toned it down by painting over it.  Given the translucent nature of metallic paints I went for a higher number of layers on the highlight.  From other people’s examples I also really tried to ‘pop’ the highlights to an extreme.  Most tutorial have the majority of the figure in darker gun metal hues and then go for a more extreme highlight in silver to mange that.  I tried that and it worked better.  My blending on the first figure is better, but the end result (i.e. you can see that there is shading) is better in the second.  The heavy highlighting there helps.


Get in my belly!
Silly detail levels
Next up will be a figure I got from The Combat Company, Degra
Miniatures - 54mm El Torres.  He was the reason I did all these metallic tests as he has a very large breastplate.  Given the larger scale I’m hoping the smooth blending I did in the first figure will work better given the larger area.  The figure has a crazy amount of detail and really shows what you can get out of a resin figure.  I have to admit I’m a little nervous and I’m not sure my skills are there for a larger complex figure.  But when failure looms, you can always undercoat again.

Monday, October 6, 2014

MOAB and Sy-Co conventions 2014

Once again I made the annual pilgrimage to MOAB and the Bring-and-Buy store.  I never get that much as I don’t play Warhammer or 40K which is probably 75% of the content.  However I’m always on the lookout for old Ral Partha figures, boardgames from the 1970’s that no one plays (but I have fond childhood memories of always wanting) and hopefully some special thing (like getting 30 back issues of WGI from Cancon on year at $2 each - yeah!).  So below is the swag from the Bring-and-Buy.


Academy German tank crew at $3

More 1/35 figures are always good practice, and this included 40 odd American and German jerry cans which someone had added to box - score!


Hail Caesar at $40

I managed to avoid collecting Fields of Glory (which I never would have played, just wanted a copy) but couldn’t resist Hail Caesar.  All those battle reports in WGI were definitely a factor.


Pegaso Models St John Order Knight at $40

This was the special item.  I’ve been wanting to get a large scale, good quality figure as part of my painting journey.  I keep looking at ordering one online (from Pegaso, Scale75, etc) but keep putting it off thinking I’m not ready, etc, etc.  However I was hoping that there would be something like this at MOAB this year and there was.  The god of lead dollies was kind to me this year.

I had to resist strongly a box of 28mm Warlord Romans at $20 and various Germanic war bard figures.  Still have that little voice telling me I need to have a large historic army (or two) before I die.  Buying Hail Caesar was an effort to get that voice to quiet down.  But 200 28mm Romans would look so good…

After enduring the smell of the Bring-and-Buy I made some retail purchases to get the swag bag up to size.


7 norman infantry (Conquest Games) at $9

I wanted a Norman war band for Saga but I’ve put that on hold for awhile.  However these two loose sprues (5 figure normal sprue and 2 figure command sprue) is enough to make up most of the 8 figure Flemish mercenary unit from Saga.


Vallejo air colour - basic colours at $50

16 air colour paints, what’s not to like


Vallejo Black surface primer at $19


That night I went out to The Combat Company for their Sy-Co convention and big kids night.  Had fun, played Zombicide, chatted about painting with Luke from The Sound of Machines, etc.  I went in the 20 minute speed painting contest which was great.  Wet on wet blending whether you like it or not.  Tried my hand at the dice rolling game but lucked out.  While there I picked up something from the specials bin.


Degra Miniatures - 54mm El Torres at $9.50

A really interest looking large scale figure which at that price was an easy purchase.  Another adventure into non 28mm scale figures.

So a good, long day in what is usually the second biggest figure shopping day for me after Cancon.  New rules, new paints and some great new figures.