Showing posts with label Death Dealer. Show all posts

Sunday, March 12, 2017

Frazetta’s Masterpieces - Act one Death Dealer (75mm) review


Recently the kickstarter for the 75mm (1/24) version of the classic Death Dealer finished and I received by order last week.  I went for the basic level.  So this meant just the figure and the free 54mm Ky-ra figure.

First up I’m a big fan of Frank Frazetta’s work and when this was first announced I ending up painting my old Ral Partha Super Hero which was a ‘homage’ to the painting in 25mm.  So I was looking forward to getting this although I almost wasn’t going to buy it (too afraid of 75mm horses I think).

Very well packed
The figure comes in a solid cardboard box with custom cut foam to hold the figure and a separate section for the base and the extra bits.  Interestingly the back of the box shows the horse having pins on the bottom of the feet but my horse does not have any.

Base
The base is quite solid.  There are holes for pins but as stated above the horse doesn’t have any.  So a bit odd there.

Main section


On the horse figure, it is great.  The painting has a very strong and violent looking horse and the sculpt captures that very well.  To be honest I like the horse over the figure in both painting and sculpt.

Pinched front legs


The only down side is that the front legs of the horse are slightly pinched.  They don’t match up to the mount points on the base due to this.  I’m not sure if this can be corrected with heat alone or if the legs will need to be cut and realigned.

Rider detail


The figure itself is just as good as the the horse.  Very clean cast and nice details.  The ringmail(?) on the lower part of the figure does sometimes end up looking like a row of dots however.  It’s a bit too straight in some sections and ends up looking like someone just ran a the end of a piece of rod down the putty in a line instead of creating interlinked rings (i.e. in an under/over pattern).  So the sculpt is true to the painting, but I find it looks a bit odd in 3D.

Rider detail


For the face, well there isn’t much detail in the original painting, just a lot of dark shading.  So the sculpt is good, but it doesn’t match what I always had in my mind of what the face area should be.

Extra bits, shield, head


Head

WRT to the Viking bust I’m making good progress on it.  I did some (more) reading of leaning to paint books and something finally clicked (it’s nothing new, it was just presented in a way that finally sunk in for me).  I’ve managed to do things a bit better and am much happier with what I’m turning out.  More on that next week.

Saturday, April 30, 2016

A bit of Tamiya, Dungeon saga and 54mm Nocturna violinist

A productive week this time round with a few little side projects all going off together.

Now that Death Dealer is done I took some better shots of him front and rear in the light box.  Glad is he done and I didn’t make a total hash of him.

Death Dealer
Death Dealer


Tamiya 1/35 German AT gun crew
I’ve had the old Tamiya 1/35 German 37mm AT gun with 4 man crew sitting around for a year or so.  I did the base coats of the figures but didn’t really like the colours.  A year later I had another go, changed all the base colours a bit and things started working.  This is the first figure of the four.  I’m using him as a way to get use to painting larger scale figures again after all the 28mm figures I’ve been doing.  In a later post I’ll put up the colour scheme I used.  I have a number of 1/35 figures in the cupboard but always get dragged away by the nicer 54mm figures I have.  I seem to purchase the old Tamiya kits out of a sense of doing pilgrimage of the classic kits (I’ve done the Africa Korps Panzer II already).  However given my interest in figures over vehicles, and the time to do a tank it’s going to be slow going on the 1/35 side.


75mm man
I purchased a number of cheap ($2 each) 75mm figures for my kids awhile back.  This one figure caught my eye much like blue man did.  I had to sculpt in some hair for him (using milliput) but he is still just a bit too rough.  I really like the pose, but the figure isn’t up to a standard that I could enter him into competition so he goes into the “for the fun of it” pile in the cupboard.


Dungeon Saga Valandor
Between working on my German I started the Valandor figure from Dungeon Saga.  My son loves him so I’m doing a quick job on him.  He is a multi part figure that has been already glued together so you can’t get at a number of areas of the figure other than just mushing the brush around.  Lots of blue and armour there.  I had to replace his spear as the original was a bendy wendy.  I used a 1.5mm wire rod for the shaft and glued the original end and tip back on with super glue.

Rough set up, figure in the blank area

Finally I started on a diorama I hope will be ready for Cancon.  The scene is a violinist (figure from Nocturna) playing next to a fountain with an audience of a couple of dogs.  There will be a cat on the fountain and behind the fence a small garden.  The violinist I will be going for will be very run down/drab and in a little bit a tragic sort of figure, who is only able to play at an out of the way corner of the city with only old dogs as company.  Even the cat will have it’s back turned to him.  Going to be a hard slog to do all the elements involved.  So far I’ve prepped the figure and under coated the animals and the violinist.  Not sure if I’ll use the paving for the ground or go for a dirty/grass area instead.

Nocturna Violinist
Next week will be a lot of experiments on elements for the diorama.  I need to trial painting the pots, the brick wall that will be behind the fountain and the fence.  Need to get some reference shots of dogs/cats and look at the pseudo Venetian costumes for the violinist.

Saturday, April 23, 2016

Tools and bases

This week I just had to finish off Death Dealer's base which I kept quite low key.  Lots of dark browns to make the figure the focus.  Now that Death Dealer is done I took the rest of the week off to have a break from painting and to some adjacent tasks.

Looks like a sound plan...

First off I decided to make myself a razor blade guillotine chopper.  I had seen these on the web (mainly on model railway sites) where they are used to accurately cut styrene rods.  Basically a straight edge with a razor blade cutter at 90 degrees to the straight edge.  There are normally some screw clamps on the straight edge to clamp down angle shapes (think the plastic triangles that come with protractor sets) so that mitre and angle cuts can be done.

The clamps in the "out of the way" position, they rotate 180 degrees to clamp down

Making a basic version I used a piece of 9mm ply for the base.  I purchased (the only bought item for the entire project) a ruler from the hardware store that I chopped down for size.  I could have just used a piece of aluminum bar but liked the option of having measurements visible on the straight edge.  The angle bracket for the handle was from the scrap box which was cut down to size.  Two 5mm bolts attach the bracket to the board and a single 5mm bolt is the pivot point for the chopper arm.  All the bolts are secured using nylon lock nuts.  The three clamp screw holes were old motherboard mounting screws that have a screw on one side and a hex nut on the other.  The clamps themselves were cut out from some metal scrap.  The chopping handle was a piece of right angle aluminum (12x12x1.4mm).  In the handle two 3mm holes were drilled so that the razor blade (just a normal razor) could be mounted.

Just add a finger.
Any cut metal edges were first painted in metal primer and then satin black enamel paint to stop any rust from forming.  The ply board was coated with 2 layers of estapol satin varnish to protect it from moisture and stains.

Do I really need one?  Do I plan to start scratch building obscure models?  No.  But sometimes it’s nice to spend a day in the shed using tools to make new tools.  Unfortunately due to the razor it has to live in the shed so the little people of the house don’t accidentally remove their fingers.  I’ve already taken the skin of one knuckle with an accident bump against the razor.

Death Dealer base
Second task was making a base for Death Dealer.  I started with a piece of 18mm pine that I cut to size and then routed around the top to give a rounded edge and smaller flat top.  The pine was then stained (Traditional Cedar) and then 4 coats of Jo Sonja's satin varnish were applied to seal it up.  Like all my bases a piece of dark green felt was glued to the bottom.  The top of the base doesn’t have any varnish (hence the discolouring) so that the glue will have a better chance of bonding.  I will drill in some pins to the base of the figure as I don’t want to rely on just the glue holding on.  The figure with horse is quite heavy.  So next week should be photos of everything together :).

Saturday, April 16, 2016

Ral Partha Death Dealer part 4

This week was a bit light on but I managed to clean up all the small areas that still needed to be done.  This was the glove, axe handle, saddle bag, horns and a general clean up.

Getting there
The horns I redid going from off white at the base of the horn to black at the tips.  Given the small area I did wet on wet blending going from VGC BoneWhite, Beasty Brown, VMA Armour brown to black.  I then went back and spot highlighted some VMC Light Sand and white on the upper most part of the horn.

For the axe handle I originally tried the normal brown to lighter brown highlighting but it didn’t work.  Instead I repainted the whole handle light brown and then attempted to paint in a wood grain using dark brown/black.  Then between the dark lines I highlighted up with a brown lightened with yellow.  It’s ok, but given the position of the axe handle so close to the body the back was very hard to do well.


On the helmet I redid some of the shadows in VMC Dark Sea Blue and redid the highlights in AP Silver and VMA Aluminium.  I also did a number of yellow and orange glazes over the helmet, top of the horse and the top of the cloak.  Basically trying to lift up the light level a bit more and also harmonise all the top parts of the figure as they will all have a very mild yellow glaze on them.  The lighting in the pictures make the helmet brighter than it is.

For the shield the bottom of the shield was still looking a bit muddy.  Instead of shading with brown I went back and started glazing down with yellow/orange and then orange to red at the bottom of the shield.  By using colours closer to yellow like orange really made a difference and made the yellow look shaded rather than brown.  I also did a number of yellow to white glazes on the top of the shield to brighten it up.  To pop out the eagle I did a very fine brown/black line around the whole eagle.  I was finding all the yellow glazes had softened the edges a bit too much.

An old Reaper paint shaker skull
Finally I started on the base ground work.  Still working on this trying to get a colour that works.  The large rock has since been repainted a dark red to tone down the base.  I also added a skull for some Death Dealer bling.  I was thinking about redoing the base to be a field of skulls but that was a bit much.

So nearly there.  Need to finish off the base and then the fine fiddle until I stop before I make things worse.

Sunday, April 10, 2016

Ral Partha Death Dealer part 3

Working on the armour initially I started with a AP Gun Metal base with a small amount of VMC Dark Sea Blue and black added in.  By adding in the Dark Sea Blue a lot of the metallic shine was removed which looked much better than the standard dark metallic colour I normally start from.  A dark metal rather than a shiny dark colour.  In the shadow areas I added some black and more Dark Sea blue.  For the scale parts of the armour I tried to underline each scale.  For the highlights I used the AP Plate Mail and Silver and finished off with VMA Aluminum.  Again each scale (where I could) was picked out.  I found that other than the helmet and scale skirt there wasn’t much armour on the figure.  The chest area unfortunately is just a blob as it’s the join area of the two parts of the mould and is quite recessed.  So I’ll have to use a fair amount of black to try and hide those (lack of) details.

A red cloak to hide the blood
Next was the cloak.  The original painting only has a slight amount of the cloak showing, with a hint of red in the painting.  So I went for red to add some life to the figure.  To unify the figure the cloak base as VMC Flat Red (4/5) and VMC Dark Sea Blue (1/5).  This was shaded down with more Dark Sea Blue (which made a nice purple shade) and black.  Highlights were done progressively with VMC Vermillion and VMC Flat Yellow and white.  I tried to add a lot of yellow highlight to the top of the cloak to get that bright sunlight look.

I had a go at the horns but then messed them up trying to do a too extreme highlight.  So they got repainted ready for another try later on.

Test shield - an experiment in yellow
I’ve been stuck on the shield for some time.  Rather than mess up the figure any more I grabbed a spare shield around the same size as the one on the figure and did some test paints.  Initially I went for a yellow base and tried to shade down with VGC Leather Brown and Beastly Brown.  However I got terrible tide lines no matter what and it all just looked dirty and muddy.  I also tried shading with purple but again it wasn’t working out.  I just can’t seem to work out shading yellow without it going muddy and ugly lemon yellow on the highlights.  So after a few sad faces I scratched that and went back a light tan (think Bleached bone) base.  At the suggestion of the wife I tried to use the pre-shading technique I had used on other parts of the figure for the yellow.

Shield start
As stated I started with a tan/off white base.  I used the AP Soft/Strong/Dark tones to then do the shading.  I had seen on one of the Painting Buddha videos the AP washes used as paints/glazes (on a very light base) with a very good end result.  So I diluted the AP washes and used those for the shading going from soft->strong->dark tones.  I highlighted up the tan base with VMA Light Sand and white.  I found this much easier to get looking right wrt the blending smoothness.  Then once done I used VMA Medium Yellow (close to the VMC Flat Yellow) and did a very light coat (near glaze) over this.  With two coats the shield now was yellow, but the pre-shading had worked.  I tried an extra highlight of VMC Lemon Yellow but that was too much and the shield started to look green, as can be seen in the picture.  However I was onto a better way to paint yellow.

Getting better
This technique I redid on the figure and the end result is much better than any previous attempts.  Needs some more work to get some more details out but it’s a good start.  For the eagle I base coated in VMC Black/Grey.  For the highlights I used the same Medium Yellow.  This way the highlights would start to transition to the general shield yellow colour.  Again this is an attempt to make the highlights more of a general bright yellow sunlight effect.  I need to go back and add some yellow glazes I think to the helmet to tone it in with the top of the shield and the cloak.

So still to do is the axe handle, the glove, the helmet horns, the saddle bag and the centre of the figure (where everything is just a blobby half cast mess).  I may also redo one of the fetlocks where the transitions aren’t a good as the other three.

Sunday, April 3, 2016

Ral Partha Death Dealer part 2

Death Dealer (with shield of failure)
Taking a break for the horse I spent a few hours working on the shield.  At the end of that I had a big pasty yellow failure and just painted over the entire thing.  Try that again later.

The next part I worked on was the fetlocks of the horse.  Again I spent a lot of time looking at various horse pictures to see how real horses look.  Surprising me was that many dark horses have white fetlocks and thus are more likely to have light hooves.  Normally the colour of the hair just above the hoof determines the colour of the hoof, which makes sense as the hoof is just hair.  So white fetlocks, light coloured hooves.

To blend the fetlock area I base coated the lower leg in a light tan colour and then did a number of rounds of wet on wet blending to try and get the transition from dark to light tan to white.  I used the wet on wet technique as I didn’t think glazing the dark brown to the light tan at the start of the fetlock hair would work very well.  So instead I did a light base coat and once that was dry put on the dark brown and tan and blended the two together with a fair amount of one brush blending (thanks Ben Komets).  This was then repeated for the tan to white area.  Finally the bottom of the fetlock hair was touched up with white using some very small brush strokes.  The brush strokes were done in the direction of the hair to enhance the effect.  I did a number of rounds of the blending until I though I was there.  Then the wife mentioned that the white needed to go further up the leg so I got to do it all over again.

For the mane and tail I wanted to start near black (as dark bay horses normally have black(ish) manes and tails.  My base colour was VMC German Black/Brown + VMC Dark Sea Blue + Black.  I’m finding these mixes are looking much better than just a straight colour out of the bottle.  They seem to result in a more nature looking colour.  I then highlighted (only) up with VGC Beasty Brown, VGC Bone white and some VMC Flat yellow.  I added in the yellow more an more to try and get that sun bright look.  I didn’t want to just highlight with tans and off whites as that would end up looking bleached.  I kept with the zenithal lighting idea but when highlighting selectively choose a few hair stands each time to paint.  This way the hair had a bit of dynamic lighting to it.  I’m ok with the tail but think the mane may need some more work as the upper neck area will the lightest area.

Love that saddle blanket.  


As there were no reins on the figure I made some.  I took some easter egg foil wrapping, smoothed it out on a hard flat surface and then cut out the reins.  These were then superglued into place.  The advantage of the foil is that you can shape it and it retains the shape perfectly (being metal).

The saddle blanket was a bit of a disaster zone to start but in the end came out quite well considering the loss of detail over time from the mould.  I would love to see an earlier production run of the figure as the saddle blanket has some great sculpting work on it but in areas it’s just all but gone as the mould has deteriorated over time.  So in order to try and work around that I ended up choosing some detail to highlight (and in some cases it wasn’t there on the figure) and repeatedly highlighting that same part again and again.  This way the paint layers actually started to build up and a near lost detail could be recreated.  I got a bit distracted and didn’t really keep track of the base colour.  Pretty sure it was VGC Khaki.  The shadows were AP Soft tone and in the very dark chevron I used VMA Armour Brown.  The highlight colours were VMC Light Sand and white.  The highlight and shading went back and forth a number of times as I keep making the shadows deeper to pop out the highlighted details.  I don’t remember how many layers I did on the top of the blanket but over 10 at least.  However it’s the part of the figure I’m liking the best at the moment.

I’ve started the armour, axe and cloak so hopefully next time round they should be well under way.  Yes, VMC Dark Sea Blue is used a number of times.  It’s almost becoming the unifying colour of the figure.

Sunday, March 27, 2016

Ral Partha Death Dealer

I took a few days off this week as I just wasn’t in the head space for painting.  I find ever couple of months there will be a week were I’m just not interested in the actual process of painting.  One night I tried and 5 minutes later gave up.  Good news is I got to watch the movie “Red Dragon” again.  I think the real reason was that I was fearing starting on a new figure so subconsciously avoiding the task.  Probably needed some more teddy bear hugs.

Five coats of paint later...
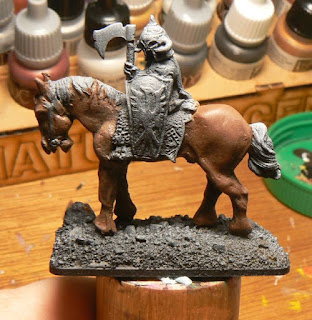
However Thursday/Friday I was feeling the mojo again and did some more trials on my practice horse.  Part of this was from re-reading Shepard Paine’s “Building and painting scale figures” which includes a nice section on horses.  I learnt so much from those few pages on horses and markings that it made me realise how bad I am at seeing things in real life.  I’ve seen hundreds of horses in my life but couldn’t tell you what body colours go with what leg markings, etc.  So after the quick read and few hours of horse pictures from the net gave me a clearer idea of what real horses look like.  So research pays off, even on subjects that are totally familiar.

I pretty much have given up on using the airbrush and just went for a light/dark almost sketching process and after an hour or so was getting some good results.  I repainted (again) my trial horse and went to an extreme highlight on the flanks and neck of almost pure bright yellow to try and emulate the sunlight look of the Death Dealer painting.  I ended up with tide marks and spots but I had achieved the result of near black under the belly to near yellow on the top of the horse.  Time for the real thing.

In a painting lesson on glazing from Mark Soley he mentioned that you should start at approx 75% lightness as your base colour rather than starting at a mid colour base as normal.  It’s easier to get darker with glazes than get lighter.  Finally took that advice and although I want the lower sections of the horse be quite dark went for a lighter colour.  This made the lighter glazes easier as I needed to do less of them to get that sun yellow highlights.  After all black covers pretty well, yellow not so much.  Also I didn’t want to end up with a black horse with no tonal variation.

My dark to light combo was

Black
Black + VMA Yellow Olive + VMC Dark Sea Blue + base
3 parts VMA Burnt Umber + 1 part VMC German Pale Brown - Base
VMC Brown Sand + Base
VMC Iraqi Sand + previous
VMC Flat Yellow + previous
The pale rider


This results in near black (looks slightly purple) under the horse, dark brown on the sides to a very pale yellow brown on the top.  The legs of the horse are quite muscular so I have been using that muscle definition to try and pop some contrast a bit more.

VMC Dark Sea Blue is a new colour I picked up after seeing (via youtube) Ben Komets use it a lot.  Pretty much Paynes grey so I can see why he likes it.  I was using VGC Night Blue for the shading but that is quite intense and makes things very blue.  So looking forward to some more trials with Dark Sea Blue.


I trialled some pale fetlocks on my test horse and they are looking ok.  It makes the horse look a heck load better than the 28mm gaming “brown horse, black hooves” look.  One of those things that without them the horse doesn’t look quite right, but you can’t say why.  However once done you immediately think “oh, that looks much better”.

So more horse next week with the fetlocks, mane, tail and tack to be done.  Should give me some time to figure our how to paint the figure.

Saturday, February 27, 2016

Dungeon Saga Elf Ranger figure

The Dungeon Saga figure paint off continues.  I was wiped out by the flu for most of the week so only did one and half figures.

Dungeon Saga Elf Ranger

First off was the female elf ranger.  My base colours were

Flesh - VMC Dark Flesh
Pants and shirt - VGC Dark Fleshtone
Cloak - VMC Olive Green
Armour/gloves - 1/2 VMC Black/Grey, 1/2 VGC Beasty Brown
Boots - VGC Beasty Brown
Bow - VGC Charred Brown
Hair - Citadel Sandri Dust

Dungeon Saga Elf Ranger

I kept the shadows and highlights pretty simple.  The only one of note was the cloak.  My colour range for it (and this was more experiment than anything) from dark to light was

(VGC Night Blue, Black as final shade glazes)
VGC Dark Green
Coat d’Arms Russian Green
VMC Olive Green - Base
AP Necrotic Flesh
VMC Light Sand (which is an off white with some yellow)

By keeping the yellow in highlights I didn’t lose the olive green or end up with chalky highlights.  Near the end of the shadows I started adding in Night Blue to the glaze to get the shadows a bit bluer.

I finished off with a pretty heavy varnish which killed a bit of the colour as the highlights were a bit brighter before.  The pictures were taken after the varnish.  However these figures are going to have a lot of sticky kid fingers on them so they need the protection.

I’ve also done the base colours of the human barbarian (lots of flesh).  Poor old Keldan has stalled a bit after Ear-gate.

Ral Partha Death Dealer (aka Superhero)


While I had the airbrush out for the varnish runs I did some grey and then white pre-shading on the Death Dealer figure to try and help me with the shading.  I did a grey spray first at approx 30 degrees from the top of the figure first, and then did a white spray at approx 15 degrees.  This way only the top surfaces of the figure get the extreme white highlight.

Saturday, February 20, 2016

More Dungeon Saga figures (and a Ral Partha classic)

Dwarf fighter from Dungeon Saga
On request from my son I painted up the dwarf fighter from Dungeon Saga as that is the character he is playing.  Nothing too fancy here with the emphasis on quick over quality.  The figure has some ugly sink holes and miscast bits so I didn’t get too concerned with making it a master piece.  Every time I see the figure I just think “Hammer time!”

Next off will be the female elf ranger figure as she is part of the standard adventurer group in the game.  With the male dwarf fighter and the female dwarf fighter (the Reaper Bones figure) that is the main party all painted (my wife is substituting the female dwarf fighter for the human barbarian).  My daughter is using her own figure which makes up the fourth figure.  I’ll probably do the human wizard and the human barbarian from completeness in the quick bake method.  After all there will be many grubby hands grabbing these and the figures are nice, but have the usual downsides of soft plastic mass produced figures with bad mould lines, missing details and sink holes.
Female Elf Ranger from Dungeon Saga

However I’m loving doing these figures quickly rather than the usual spending three weeks to paint a shield like I do on 54mm figures.  I’m also noticing that even doing these quickly how much better they are than all the older figures I painted for RPGs.  Zenithal lighting really makes a difference.  Also my brush control is much better.  I’m able to do the faces way better than before, and without needing a 10/0 brush.

I’ve found most of the figures with Dungeon Saga were bent in some way.  The recommended way to fix this is to put the figure in hot water to make it soft.  I found a better way was to use the heat of a cigarette lighter to make the plastic very soft, reposition and then put the figure under cold water to set.  However you have to be very careful as the heat can burn off some fine details and the plastic gets very soft very fast.

Finally I cracked open a figure I’ve had for 15 odd years.  This is the Ral Partha “Superhero” figure.  Sculpted by Tom Meier it is pretty much a direct take on the Frank Frazetta picture “Death Dealer”.  There have been a few pictures of larger scale Death Dealer figures going around recently so I got all inspired.

Ral Partha Superhero - aka Death Dealer


The figure does show it’s 40 year old vintage (made 1976).  The horse figure is one piece so there were some compromises needed for the mould, like the riders feet not hanging below the belly of the horse.  Also being a very old figure the mould has degraded a bit and some of the details are pretty soft.  That all said still a great figure.  To be honest the horse is really the highlight.  The sculpt totally captures the menace of the original painting.

Ral Partha Superhero - aka Death Dealer


I rebased the horse and rider on a plastic base and built up the ground with some milliput and rocks.  It will probably sit around for awhile while I consider how I’m going to do it.  Not sure if I will paint the foot figure.  The axe is all wrong and the legs aren’t that good.  Plus I’m having too much fun painting Dungeon Saga figures.