Showing posts with label bust. Show all posts

Monday, September 18, 2017

Worm bust part 1

So I started on my worm bust this week, however most of my time was spent doing some shed jobs.  Sometimes you just have to let the urge to chop pieces of wood into smaller pieces take over.


I wanted to have a limited colour range used on this bust.  The best thing about making your own busts is that you have an unlimited number to try things on :)

For the back shell I used VMA Scarlet, VMC Red and JS Napthol Crimson.  Some JS Pthalo green was used in the shading as well as some purple ink.  For the highlights I added some JS Cadmium Yellow mid to make orange (and later white) and mixed that in with the base.


For the eyes I’m thinking of yellow with white highlights.  For now I have just blocked in the eyes with JS Cadmium Yellow mid.

For the skin I used JS Sap Green as the base.  Highlights are done by mixing in JS Yellow light and shading by adding in JS Pthalo green and violet red/purple to the mix.  I’ve done some work on the top of the head but haven’t done anything on the area around the neck and below yet.


For the shirt I made a burgundy red/purple from the VMC Red and highlighted that up with some purple ink and white.  The collar is JS Yellow oxide with some JS Cadmium yellow mid  added.  I think I want to add some pattern to the shirt to add some detail as the figure is quite plain.

As you can see not many colours there with some (Cadmium yellow mid, purple ink, pthalo green) being used on multiple sections to try and tie things together.

Monday, July 24, 2017

Worm bust done and resin casts, plus some Terminator Genisys

Casting of the Worm bust (need a real name)
So on my worm bust I finished off a few little areas and smoothed everything down ready for casting.  I use PinkySil for my silicon moulds.  For the housing of the mould I used a plastic cup as the container as this means when I am doing castings I can just use the same type of plastic cup to hold the mould together.  This was important as I knew I would have to slice the mould at least half way down to get the figure out.  Once the silicon was set I did the standard curvy cuts in the silicon so that the mould halves would mate back together well.  I unfortunately cut the bust in a few areas while cutting it out.  Also the head was at the bottom of the mould and the head crest and buggy eyes are quite hard to get out of the mould.  Harsh words were spoken.

Master and test casts

Then it was onto casting use Easycast resin.  I made a mistake on the first few castings by over shaking the resin and this resulted in lots of bubbles in the cast.  The next few were better, but still some bubbles.  I then switched from mould release spray to talcum powder to coat the mould.  I had read that the talcum powder draws the resin into the small areas of the mould better.  Turns out that is correct.  Had the best cast of all.  Just a few minor bubbles that I filled with Milliput and I added some putty to the front collar.

Collar redone and brass tube glued in.


Like all my busts I made a base for it first as I don’t like to have to do that after the figure is painted.  I also glued in the brass tube into the base of the figure.  I undercoated the figure black and then did the white zenithal highlights as per normal.  So now it’s ready to go.

I found the whole process really rewarding.  Key was to take it slow and only do one small area at a time and let the putty dry.  There were at least 7 sessions of putty work and quite a bit of scraping in between.  My hand made 2mm micro chisel was great for that task.  The second pair of eyes/opinions my wife added helped a lot too.  When you have no clear idea of what you are trying to produce (i.e. just winging it) it’s good to have someone else point out the defects.

Terminator Genisys figures
While I was waiting for paint to dry I cranked out 4 more Terminators.  These guys are going to be pretty easy to do.  Pretty much the sci-fi equivalent of skeletons.  Of course the humans are going to take much longer.

Before I paint my worm bust I really want to get back to Adokul the Monk.  However I still don’t have a good idea on his armour.  Getting a mental log jam on that.  I think I’ll just have to take the plunge and get some paint on him.


Monday, July 17, 2017

Worm bust sculpting

So just did more sculpting this week.  Also tried some Milliput Superfine (white) and green stuff (GS).  However that didn’t work as well as I hoped.  It was a bit too crumbly while I was working with it.  However when it set and was hard it was fantastic is smooth out.

I’ve learnt that having different materials (straight Milliput, Milliput + GS, Milliput fine + GS) it not a great idea when trying to smooth things down with a scraper (i.e. knife blade/chisel).  Each material has a different hardness level so scraping across materials means you bite out more of one material over another.  So despite trying to eliminate bumps between putty areas you can add to them.

I’m always annoyed when reading some tutorial/blog and the author does the “forgot to take a picture of this stage..”  Oh well, joined that group now.

Going thought the stages:

Added some more to the shoulders and made the lower back shell segment into a cloak.  I needed some more material on the bottom of the bust as it was looking very top heavy.  Also added some detail around the eyes.

Collar added
Adding in some nose ridges (missing photo ;) ) in Milliput superfine/GS, hence the area that looks like toothpaste.

Head ridge and nose area done
Redid the top of the head and added a head frill and top ridge.  Also some more on the top of shoulders and added some more neck ripples.  I extended the neck area behind the eyes to make the eyes less sticking out.

Neck/eye area
I then put some two part epoxy on the base to smooth it out and reinforce it.  Then the wife mentioned I needed a mounting base so scraped out that a bit and added in a base made from Milliput.  I also fixed up the collar with some GS.

Great idea, wrong time
Next up is to clean up the base and slice off the shoulder edges to make a clean edge.  I’ve also smoothed down all the figure with 800 grit wet and dry sandpaper.  With the base done I’m seriously considered casting the bust in silicon to see how to do that for a complex figure.

Mounting base added


Monday, June 12, 2017

Banshee Anonymous bust finished, the next project and a Dungeon Saga troll

Anonymous bust
Just tidied up the bust some more with various little bits here and there.  I redid the rear left shoulder and then decided to continue on the open wound look and made a patch of raw flesh/meat in the hollow area.


To add to the depth I highlighted a mid point area and put a very dark shade below it to try and reinforce the depth perception of the area.


I’m pretty happy with the overall result.  This was my first bust I purchased and intimated me for over a year.  Seeing all the amazing versions online didn’t help.  Really happy I attempted it as it pushed me way outside my comfort zone and I’m not likely to paint this much flesh again in one figure.  Really like how I did the orange hair.  Go complementary colour shading!


I’m now totally converted over to making my own flesh mixes for larger scale figures (for 28mm quick and dirty figures maybe not).  I’m also in awe of people like Ben Komets who paint flesh with only four colours and make it work.  I was getting up to eight base colours in some stages and thinking that I was making it too complex.

Dungeon Saga troll shaman
After the bust I finished the last Dungeon Saga troll.  Now just the orcs/goblins from the second expansion to do.  Think I’ll have a long break before them.  I have the Terminator figures and some LotR figures I want to do as my background/in between painting tasks first.

Adokul the monk
A few years ago I got a subscription to the new defunct Figure International magazine by Andrea.  Part of the subscription was the figure ‘Adokul the monk (RS-013)’.  A very Warhammer (40k) inspired figure.  Lots of big armour bits and skulls.  He will just be on a small base, no big diorama.  I think I will modify him a bit and have his hammer with the head at the top of the figure (rather than under his foot) and have his left foot on something else.  Doing some dry fittings to try out options.  I’ll leave off the arms for painting for now.

Lastly started helping my son (his is 6) work on his first entry to the Crystal Dragon painting competition.  A strange diorama (20x14cm) with four small areas with a high brick wall separating the areas with a mix of skeletons (Reaper Bones), scorpions (Reaper Bones) and eagles (Eureka) in each area.  He has a very strong story idea, I’m still getting there.  Of course when my daughter saw that we were doing it, she started working out what she wanted to do.  All about the next generation :)

Monday, June 5, 2017

Banshee Anonymous bust part 2

Pretty much more of the same this week.  I continued to work on the Anonymous bust, working my way around the model and fixing areas up.

Banshee Anonymous bust

First area that needed some work was the back.  The left shoulder blade needed to be made closer to the right shoulder.  Also the lower back area needed the contrast pushed a bit more.


The left side of the neck proved to be the hardest area.  My original attempt had resulted in a very purple skin finish.  Also the hollow areas were much too stark and continued too far up the neck to the head.  I had a very big inverted V on the side of his neck.  This got repainted at least half a dozen times as I just couldn’t get the colour where I wanted it.  Always too purple or too brown, loosing all the orange tones.    In the end I found using VMC Dark Sea blue instead of VMA Armour brown as the shade colour seemed to work.  I think I’m almost there now.


Under the scar area on the left side of the head I put some normal flesh colour at the base of the neck.  This helped define the area and stopped the shading in the hollows of the neck from continuing all the way up the head to the scar area.  The scars were worked on and I added some more dark red/purple shadows next to the flesh lines to make them pop a bit more.


The wife mentioned that the hair stubble didn’t look different enough from the flesh.  So I took the contrast a bit further.  I used very small dots of colour (both the shadow and highlight) over the stubble area and then with a wet brush sumped the dots out much like you would with oil paints.  You have to be quick as the small dots dry very fast.  I used the same technique on the beard.  I probably should have used the flow medium I have to help out there on second thoughts.  The main hair got some more highlights.

Lastly I glued the figure into the base before the final finish up tasks.

This week more touch up work and trying not to ruin things by over fiddling them.

Monday, May 29, 2017

Banshee Anonymous bust

Anonymous bust by Banshee
The Anonymous bust done by Banshee (Alfonso Giraldes) was the first bust that I purchased over a year ago.  It’s been sitting in the draw waiting for me to get brave enough to try it.  I found the expanse of flesh (and nothing but flesh) quite intimidating.  I decided to start it about five weeks ago and it just sat on the desk.  Proverbial mental roadblock.  I just couldn’t find a way to start it and didn’t want to do it badly.  So it sat unpainted.


Finally this weekend I just dived in.  I used a number 2 flat brush to just get the paint on quickly and to sketch out the rough shadows and highlights.  I found that using the flat brush really enjoyable as it had quite a good point (chisel tip?) and I could use it to do some fine lines as well.  In the end I had to stop as I was doing wet on wet (on wet) and paint was lifting off and leaving bare patches.  The end result was pretty rough and rather orange but I had started.


On the next session I pretty much repainted most of the figure and started getting the colours right and trying to get the blend areas smoother.  I’m keeping the paint very thin for the most part, trying to build up layers to give the skin some depth.  I did the eyes as not having them done was throwing me off.  I think they may be a bit bright however.


On the left side of the face the check groves ended up becoming three scars.  They aren’t really sculpted that way but I used some darker colour to suggest the scars.  I then got the idea to continue that theme and made the left side of the head scarred/burnt as well.  I’m alternating the colour areas by using dark red/purple for the damaged flesh areas and the skin highlight colour for the scar area.  So far lots of glazes used to give some depth.  Unfortunately I’ve made a pattern and need to break that up so it looks more random.  The brain just loves uniformity.

The hair I went for a ginger/orange.  So far it seems to be working, but I have to be careful that the highlights don’t go pink and stay orange/yellow.

So much mixing
Before I started it did a couple of test mixes to try and get the flesh colour sorted using Jo Sonja paints.  I’m really liking just working with basic colours and doing mixes.  Rather than make up a pot of flesh colour (like I did for the Cimmerian King figure) I deliberately didn’t.  This forces me to mix every time and get the mixes consistent.  Hard to do but it’s the only way I’m going to get better at mixing.  I find my flesh mixes always get a bit yellow as I don’t add enough white to begin with.  However I also found that a dot of purple in the mix helps a great deal in neutralising the yellow.  The colours I’m using are

Jo Sonja
Raw Sienna
Burnt Sienna - more red than brown I find
White
Light Yellow
Cadmium Scarlet
Napthol Crimson
VMC Violet Red
VMC Dark sea blue

The basic flesh mix is raw sienna, light yellow, white and spots of orange, red and the violet red.  The highlights are more white and yellow and orange, the shades more violet red, burnt sienna and red.

 My custom Jo Sonja paint holder :)
Going forward I need the scars to more pronounced and the base of the neck and back need work.  I’m really happy with the cropped hair fuzz on the right side of the figure.  I think the forehead may be a bit yellow.  I’m wondering if the green of the cutting mat I have in my painting area is throwing me off slightly.

Finally keeping with tradition I did another Dungeon Saga Troll.  One to go.

Sunday, May 14, 2017

Terminator Genisys and other bits

Defenders of justice
Work was a killer this week so just did stuff on the weekend again.  Trying to get back in the groove I made up the figures for the Terminator Genisys game.  These are designed for younger players and are all (slightly) snap together (although I used glue) and the base/legs/body are one piece.  There are two terminator bodies with two weapons combos.  So not much variety there when you have to make ten figures.  I did a few head moves (cutting off the head and repositioning it) and converted two figures.  One became a command unit (with some aerials on it’s back and one got two guns (it borrowed a gun from the humans).

Crawlers
The five crawlers I glued onto bases and gave one a knife just for variety.  They never stop!

So many pony tails
The human figures have four body types, with seven arm options.  However one figure is restricted to only two weapons.  The arms are only designed to go in one position but if you slice off the tabs on the body that the arms fit into you can reposition the arms.  A few figures lost their ponytails and one head got moved.  Unfortunately the figures are very slim and the heads are tiny.  So I couldn’t use any of the spare heads from other plastic figures I have.

They just need a bit of putty work and then off to be undercoated.  I need to get back into the habit of painting during my lunch breaks at the LGS which is only 5 minutes away.  A great way to churn though figures like these.

Preshaded Dungeon Saga troll
I started Dungeon Saga troll number two, trying the pre highlighting and then AP Strong/Dark tone washes.  Looks much better with pretty minimal effort, so happy with that experiment.

Tamiya AT gun crew
Finally did a bit more on the WW2 German AT crew member.  Forgot how to paint flesh and had to relearn that.  I always end up too brown on the first attempt.  I’ve resigned the AT gun and crew to the experiment list given the time I’ve taken to do them.  It also subconsciously takes the pressure off knowing that they don’t have to perfect, rather I just need to learn new techniques from the project.  Next up is the AT gun itself so more experiments here.

Roman bust, aka terminator god
Finally two second hand busts arrived.  Unknown manufacturer on both.  The Roman is lovely.  The face is just superb.  The Celtic figure is good, but the hand is the wrong one!  The figure needs a right hand, but the one supplied is a left hand.  It will be hidden by the shield so I might get away with using it.

Celtic bust


Monday, May 1, 2017

Dungeon Saga and Banshee bust prep

Dungeon Saga Dwarf King


Continuing on with the Dungeon Saga figures I painted up the Dwarf King.  As the other dwarf undead figures had purple(ish) cloaks I gave him one too.  I went for a yellow/green tunic to set off the cloak a bit.  For the crown I did a some experimenting.  Rather than painting it gold I did two coats of VMC Smoke over the white undercoat, and then added in some yellow for the highlights.  As the Smoke is translucent it really lets the white come through.  So not true NMM but it does look a bit metallic :)

Dungeon Saga Troll - base coat on flesh
Now I have the three trolls to do.  Not wanting to get bogged down on the larger figures I started with a VMC Green Brown and then did a AP Strong Tone/Dark Tone wash.  Next I will pick out the details (bones, stomach bits, ropes, etc) and see how it looks.

Did more coats of water effects on Inanis.  Getting there slowly.

Banshee training bust

I’ve been a bit stuck on what to do next.  I have a few 54mm figures I’m thinking about but just can’t commit to one.  I’ve had the training bust that Banshee (Alfonso Giraldes) made for a while so decided it was time to get that out.  The bust normally comes with a base designed so you can hold onto the figure while painting.  Very handy but it looks a bit odd.  So I cut that off and mounted the piece on a brass rod as usual.  However the first time I did this I got the angle wrong and had to remove the rod (heating the brass rod helps break the glue btw) and try again.  I will make up a simple wooden base later.

With Salute just gone Warlord Games were offering the Terminator basic set for 10 pounds.  I couldn’t resist and got a copy.  This triggered an episode of terrain making as I haven’t done any for some time.  Once a flocker, always a flocker.  I took two of my old 2x4 foot mdf boards that were covered with static grass paper mats, stripped off the paper and painted one side a mid brown.  Then I airbrushed over a variety of colours (dark brown, light brown, a few greens) to break up the brown.  I’ve done one board with the other to be done this week.  I also had five plaster rocks in the cupboard that I painted up the same brown and then dry brushed them and flocked them.  Almost got this terrain bug out of my system.

Monday, March 20, 2017

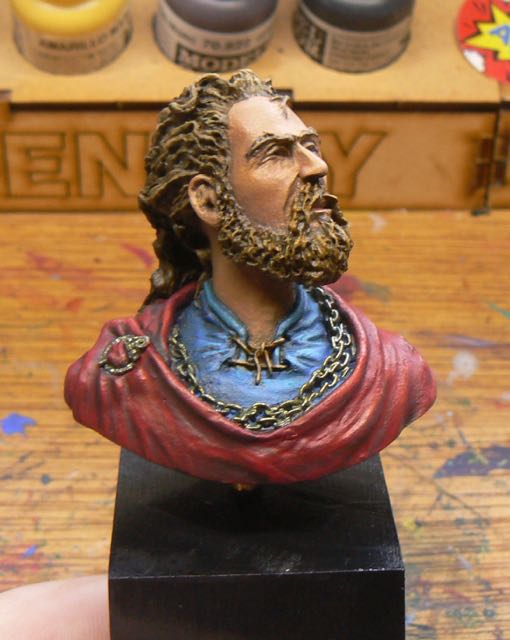
Viking Bust finished

Over the last two weeks I’ve been playing around with the Viking bust I have.  Along the way I purchased the book "Making Colour Sing" by Jeanne Dobie.  I’ve read a number of how-to painting books across oil/acrylic and watercolour techniques.  Mostly I’m trying to get a deeper understanding of painting composition and colour techniques.  Like all instructional books most say the same thing, just in different ways and with a different emphasis.

Viking Bust
Although this is a water colour specific book it had a very good section on complementary colour theory and neutral greys.  I’ve read this a number of times before but for some reason this one really clicked with me.  I finally (slow learner) realized that to get the colour pop that I’ve been looking for one of the secrets was to shade in the complementary grey of the colour you are painting.  When mixing complementary colours you end up with a ugly grey.  However by altering the ratio of the complementary colours that can be a green grey, a red grey, etc.  So for the red cloak I shaded down with a dark green.  The darker shades had some black mixed in too.  This meant that the red next to the green/grey would stand out more.

Highlighted side of face


I tried this on the face as well and finally started to get some real highlights.  Before I was adding in more white for highlights and getting a bleached out look, or shading with dark colours (to increase the contrast) and just making the flesh look muddy.  Now I got that the opposite of yellow is purple, hence why shading flesh with purple kind of worked in previous attempts.  Also this explained why VMA Armour brown was working (it has some purple in it) with my flesh mixes.

Again, all of this I had ready a number of times before but when I tried to apply that knowledge it didn’t work/click.  Finally it did.

Pre-shading on chain
For the gold chain I decided to do some pre-shading rather than do a heavy gold coat and then try and shade it.  So I used VMC Golden brown as the main pre-shade colour and used VMC Dark sea blue and VMC Flat yellow for the shades/highlights.  I’m still going with the directional light source so the chain closer to the light source was much lighter.  With just one coat of the gold I really got the effect I was after.  I did some extra highlights with VMA Aluminium and metal medium (aka sparkly paint).


I’m not 100% on the hair, but I’m finding the bulk of it slightly excessive and overflowing.  The figure must be using some serious hair gel to get those size ridges.

For the shirt my base as VMC Turquoise and VMC Prussian Blue.  I think this is where my new knowledge paid off the best.  Normally I just darken blue with dark blue/black.  Instead I used dark orange for the shadows under the face.  That really flattened out the blue.  I used light blue/white on the highlights and stayed away from any yellow (to avoid things going green).  Very happy with that shirt.

On the cloak I went too hard on the highlights on the shoulder and ended up with orange stripes.  So I went back and raised the colour of the shoulder in general and then redid the highlights.  I also cross hatched the highlight areas in an effort to show a bit of the cloth texture.  That worked a bit, but really I need to do the whole cloak with the cross hatching for that to work properly.

The base is a piece of pine chopped at an angle and painted satin black.  The figure is attached by a piece of brass tubing (1/8 inch).

So my first try in directional light is over.  It worked ok.  It looks like there is a brighter light from the side of the figure.  It isn’t extreme which would probably look better, but I think it is enough.  The figure is a bit odd in that logical highlight area is not on the front of the figure but I enjoyed the size of it.

Saturday, March 4, 2017

Tribal Warrior done and Viking bust started

After a bit more of a break I finished off the Tribal Warrior.  Or more correctly gave up and just finished it.  My heart just wasn’t in it to be honest and I never should have started it.  One of those “well I bought it, I should paint it..” times.

Tribal Warrior


For the metal's I kept them very cool and that seemed to work out.  For the highlights I used some Vallejo Metal Medium.  Basically the sparkle in metallic paints, not pigment at all.  Makes the Aluminum paint I have look dull :)


For the shield I couldn’t work out what to do so after doing a whole lot of brown shading I covered the shield in AK Worn Effect chipping fluid and painted it red.  Then I wore back the paint to uncover the wood.  The end result wasn’t too bad.

Top view
It needed some more work but by this stage I was done.  The figure got based and into the cupboard with it.

1/16 Viking Bust
Recently I purchased a 1/16 bust of a Viking.  He has very squinty eyes suggesting that he is looking into the sun.  So I decided to try for a very directional light in the shading (instead of the usual zenithal approach).  I didn’t want to go the whole OSL ‘lantern in the dark’ look, more of a sun bleached look.  I’ve just blocked in the shirt, cloak and hair so far.  I did a lot of work on the face and then the wife told me I had made it too yellow (trying of the sun look).  Yep, he had some serious health issues.  So I’m now repainting it with more red in the mix.

Attempts at directional lighting
Instead of the normal flesh colours from the pot I’m mixing my flesh again.  I’m using a base of

VGC Leather Brown
VMC Red
Jo Sonja’s white - really liking this white, seems warmer than the VGC Dead white.
VMC English Uniform
VGC Plague Brown
VMC Golden Brown

Shade down with
VMA Armour Brown
VMC Violet Red
VMC Dark Sea Blue

Highlights with
VMC Light Yellow
more white

The small amount of red is needed to stop the attack of the yellow skin condition.  However it is really a tiny amount in the mix.  Any more than a pin head and it’s pink city.  I’m wondering that as my flesh mix ends up close to the standard Vallejo flesh colours am I just make a rod for my own back?  Jury out on that one.

I’m trying to get the whole ‘shade with a complementary colour’ technique to give a wider range of colours to make the figure pop some more.  The idea of having the full colour spectrum in an area and using the natural grey of two direct complementary colours to enhance (read pop) the features.  I found at Cancon my figures looked really flat compared to the better figures.  I’m also trying to do the shades in cool colours and highlights in warm colours.  Most times I fail and over use yellow (see note about unhealthy skin above).

Hair too light, darker now
Since the picture I’ve redone the hair to be much darker.  It matches the skin a bit better as I was finding the beard highlights were getting very unnatural on the original hair colour.

Sunday, January 22, 2017

Halo Fleet battles human captain bust finished

Halo Fleet Battles Human Captain bust


The week I finished off the human captain bust from Halo Fleet Battles just in time for Cancon.  Wasn’t planning on taking him down but he went rather well and in the end I will take him over the Amy Johnson bust.  She is painted with straight out of the box flesh colours and it shows.  Long live the new flesh (colour mix)!

Back view


For the captain bust my colours were as follows.  Very much a study in blue.

Main Shirt
- VMC Sky Blue 40%
- VMC Flat Blue 50%
- VGC Ghost Grey 10%
Highlights with more Ghost Grey and white, shadows with Prussian Blue

Under shirt
- VGC Ghost Grey - base
Highlights with white, shadows with VMC Dark Sea Blue (very small amounts and glazed)

Hard Amour
- VMC Prussian Blue 50%
- VGC Night Blue 50%
Highlights with Flat Blue, Shadows with more Night Blue and Black.

Flesh base
“Cimmerian King” mix 50%
VGC Bleached Bone 50%
Highlights/Shadows as per Cimmerian King

Hair
- VMC Black/Brown 50%
- VGC Cold Grey 40%
- VGC Ghost Grey 10% - I found the Ghost grey makes this a bit purple so later on swapped it out for a straight grey mixed from black/white.

Under the sea...
My daughter has finished up her mermaid diorama.  Just needs the mermaid to be glued to the base.  I wish she would paint more than once a year :)  My son (a bit too young to enter) is very keen on painting currently so I will get him some figures at Cancon (probably Reaper Bones) just for him, so he has his own figures rather than getting them off dad.

Swim time
Now the wait until Friday.  Going to be a long week at work waiting…