Showing posts with label Dungeon Saga. Show all posts

Monday, October 15, 2018

More putty work and a Dungeon Saga figure

So the putty work continued this week.

All ready for primer

Up first was the wing claw of the GW LotR Balrog.  This had been snapped off at some stage.  First up I drilled and glued in a paper clip shaped the rough curve of the other claw and then covered it in Milliput.  Once dry I carved this down to match the existing claw.  After that I sanded the Milliput with 320 and then 600 grit sand paper to smooth out the surface as the existing plastic claw is very smooth of course.

Redone claw
I then dropped the figure and chipped off the end of the claw.  So I switched to green stuff as it is more flexible and redid the tip of the claw (unfortunately not as sharp) and added in some more knuckle shapes, etc.  Calling it done at this stage.

Final thing was drilling and pinning the feet for attaching to the base.

Two joins only - take that Balrog
I also did a bit of green stuff work on some Reaper Bones figures I purchased to cover up the join marks.  Nothing major there.

I had planned to start priming all these figures but the weather has been too wet whenever I'm at home and the shed does get a bit cold and humid so decided to wait a bit.

Dungeon Saga figure
Finally actually did some painting and worked on the Kickstarter exclusive figure from the Dungeon Saga kickstarter.  Kind of need a small figure to get back into things after near two months with very little painting.

Monday, September 11, 2017

Adokul the Monk part 7 - finished. Plus Terminator Genisys and Dungeon Saga bits

Adokul the Monk
Well I mucked up the gluing this week.  I attached the figure to the base with two part epoxy as per usual.  However I had too much glue on the feet of the figure and some glue spread out as I pushed the figure down.  The end result was that some paint from the base got lifted and there are some glue visible.  I repainted the areas where paint was lifted but unfortunately the texture is now different (i.e. quite rough compared to the smooth surface of the plastic card).  Even though I painted over the glue spread around the feet again the texture is different and it shows.  Rather annoyed that I did that to be honest.  A real down result after a long paint.


Other than that there was some little clean ups on the figure and fiddling with some sections.  Nothing major but at some stage you just have to stop.  So I’m calling him done now.  On a side note I have a nice supply of books now for the next diorama.


Most of the rest of the week was allocated to shed work so painting was light on.  I finished the last four terminator figures (including the command figure with scratch built comms backpack).  I also painted up Blaine from the Dungeon Saga kickstarter.  He was one of the exclusive kickstarter figures.  Had an interesting bone helmet on.  I like painting these one off figures as it gives me a chance to experiment at bit with no downside.  If the experiment fails at least there is one less figure to paint.  For Blaine I tried out some new ways of painting brown on both the cloak and the armour.

Blaine from Dungeon Saga
With the cloak I started with VMC Leather Brown and shaded down with blue ink, a touch of green ink and black.  This is because blue is the complementary of orange and brown is dark orange.  For the highlights I used JS Yellow Oxide and then Cadmium Mid yellow and white.  I didn’t get as much contrast as I would have liked so still need to work on that.


For the armour I mixed up a warm black from VMC Flat Red, JS Yellow Oxide and blue ink (I think).  I then highlighted that by adding in more tan to the mixture.  For shadows I adding in purple and black.  I liked the end result as it was something different and gave a much different look.

Terminators
On the side project list up next are the humans for the Terminator Genisys game.  The will probably take a bit longer given they have more to paint than the terminator figures.  Some are in army uniforms, others are more ragtag.  Also lots of ponytails.  Guess barbers are hard to find in the future war environment.

Other candidates for side projects are the orcs from Dungeon Saga and the LotR figures I have.  Not sure I want to start the orcs as there are quite a few to paint.

For the next main figure I will be starting my worm bust.  I’m thinking red currently rather than the standard cooler schemes that worm things have.

Monday, June 12, 2017

Banshee Anonymous bust finished, the next project and a Dungeon Saga troll

Anonymous bust
Just tidied up the bust some more with various little bits here and there.  I redid the rear left shoulder and then decided to continue on the open wound look and made a patch of raw flesh/meat in the hollow area.


To add to the depth I highlighted a mid point area and put a very dark shade below it to try and reinforce the depth perception of the area.


I’m pretty happy with the overall result.  This was my first bust I purchased and intimated me for over a year.  Seeing all the amazing versions online didn’t help.  Really happy I attempted it as it pushed me way outside my comfort zone and I’m not likely to paint this much flesh again in one figure.  Really like how I did the orange hair.  Go complementary colour shading!


I’m now totally converted over to making my own flesh mixes for larger scale figures (for 28mm quick and dirty figures maybe not).  I’m also in awe of people like Ben Komets who paint flesh with only four colours and make it work.  I was getting up to eight base colours in some stages and thinking that I was making it too complex.

Dungeon Saga troll shaman
After the bust I finished the last Dungeon Saga troll.  Now just the orcs/goblins from the second expansion to do.  Think I’ll have a long break before them.  I have the Terminator figures and some LotR figures I want to do as my background/in between painting tasks first.

Adokul the monk
A few years ago I got a subscription to the new defunct Figure International magazine by Andrea.  Part of the subscription was the figure ‘Adokul the monk (RS-013)’.  A very Warhammer (40k) inspired figure.  Lots of big armour bits and skulls.  He will just be on a small base, no big diorama.  I think I will modify him a bit and have his hammer with the head at the top of the figure (rather than under his foot) and have his left foot on something else.  Doing some dry fittings to try out options.  I’ll leave off the arms for painting for now.

Lastly started helping my son (his is 6) work on his first entry to the Crystal Dragon painting competition.  A strange diorama (20x14cm) with four small areas with a high brick wall separating the areas with a mix of skeletons (Reaper Bones), scorpions (Reaper Bones) and eagles (Eureka) in each area.  He has a very strong story idea, I’m still getting there.  Of course when my daughter saw that we were doing it, she started working out what she wanted to do.  All about the next generation :)

Monday, May 22, 2017

Milliput is my friend

So a week of bits and bobs.  With my two new busts I wanted to get them ready for painting in the future.  So this meant time for the putty.  In the end it needed two goes to get all the holes filled.

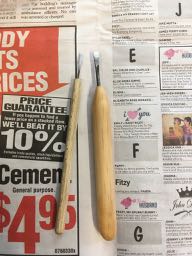
Home made chisels
Firstly I trimmed down all the mold lines on the busts.  My new micro chisels I made recently worked great.  Rather than trying to scrape a mold line (very hard across hair for example) instead I could just cut off the line straight on, a small bit at a time.  The little 2mm chisel was great.  Wish I had made these years ago.

On the large roman figure there were a number of small holes/negative bubbles to be filled in.  On the back of the figure an edge had been broken off (about 4mm x 1.5mm).  This also had some stitching pattern on it so after I had built up the area I got a second thin roll of putty and lay it down and then put in the pattern.

For the smaller celtic bust there was a major negative bubble at the bottom of his cloak.  There were also a few gaps between his arm and body.  Finally on his helmet the edge banding was missing from approx 25% of the rim.  Some very thin putty and deep breaths were needed to get that fixed up.  It’s very hard to get the putty to stick on initially when it is that thin without squishing it down flat.

For larger scale figures (like busts) I prefer to use Milliput (standard) over Kneadatite aka green stuff.  As Milliput goes very hard it can be scraped and polished.  This is essential for repairing a cloak for example where you need to have the repaired putty section as smooth as the other adjacent areas.  After putting on Milliput to an area I first smooth it down with a sculpting tool.  Once the area is looking right I then use a damp paint brush to remove any tool marks.  After the Milliput is dry I then will usually scrape the area (if possible) with a scalpel blade.  I also make sure I scrape some of the surrounding resin area to ensure both the resin and the Milliput are the same level (i.e. no step up/down).

For smaller areas I like to mix Milliput and green stuff 50/50 as is easier to work with but goes reasonable hard unlike green stuff by itself which stays very rubbery.

Preshaded figures
I undercoated/preshaded all the Terminator game figures and both the busts in the usual black then white highlights.  I was thinking about spraying the terminator figures with a metallic coat but decided that to get full coverage of the figure I would end up loosing the preshading as there are a lot of nooks to get the paint into, which means a number of spray coats to get them all.

For the busts I drilled out a hole in the bottom for mounting.  I need to work out their bases next so I can cut and glue in the right size of brass rod.  I don’t like to be gluing and measuring up bases once the bust is painted.  Late in the weekend I went and got some more wood from the hardware store around the sizes I think will work.

Underground entrance

Tunnel entrance

Rough ground scatter
I did a bit more work on some pieces of spot terrain.  Two underground entrances and a small area of rough terrain.  I think the rough terrain may end up being for LotR or Saga.

More troll love, with pre shade highlights
Lastly did another Dungeon Saga troll.  Only two more to go then the base set is all painted :)

Sunday, May 14, 2017

Terminator Genisys and other bits

Defenders of justice
Work was a killer this week so just did stuff on the weekend again.  Trying to get back in the groove I made up the figures for the Terminator Genisys game.  These are designed for younger players and are all (slightly) snap together (although I used glue) and the base/legs/body are one piece.  There are two terminator bodies with two weapons combos.  So not much variety there when you have to make ten figures.  I did a few head moves (cutting off the head and repositioning it) and converted two figures.  One became a command unit (with some aerials on it’s back and one got two guns (it borrowed a gun from the humans).

Crawlers
The five crawlers I glued onto bases and gave one a knife just for variety.  They never stop!

So many pony tails
The human figures have four body types, with seven arm options.  However one figure is restricted to only two weapons.  The arms are only designed to go in one position but if you slice off the tabs on the body that the arms fit into you can reposition the arms.  A few figures lost their ponytails and one head got moved.  Unfortunately the figures are very slim and the heads are tiny.  So I couldn’t use any of the spare heads from other plastic figures I have.

They just need a bit of putty work and then off to be undercoated.  I need to get back into the habit of painting during my lunch breaks at the LGS which is only 5 minutes away.  A great way to churn though figures like these.

Preshaded Dungeon Saga troll
I started Dungeon Saga troll number two, trying the pre highlighting and then AP Strong/Dark tone washes.  Looks much better with pretty minimal effort, so happy with that experiment.

Tamiya AT gun crew
Finally did a bit more on the WW2 German AT crew member.  Forgot how to paint flesh and had to relearn that.  I always end up too brown on the first attempt.  I’ve resigned the AT gun and crew to the experiment list given the time I’ve taken to do them.  It also subconsciously takes the pressure off knowing that they don’t have to perfect, rather I just need to learn new techniques from the project.  Next up is the AT gun itself so more experiments here.

Roman bust, aka terminator god
Finally two second hand busts arrived.  Unknown manufacturer on both.  The Roman is lovely.  The face is just superb.  The Celtic figure is good, but the hand is the wrong one!  The figure needs a right hand, but the one supplied is a left hand.  It will be hidden by the shield so I might get away with using it.

Celtic bust


Monday, May 1, 2017

Dungeon Saga and Banshee bust prep

Dungeon Saga Dwarf King


Continuing on with the Dungeon Saga figures I painted up the Dwarf King.  As the other dwarf undead figures had purple(ish) cloaks I gave him one too.  I went for a yellow/green tunic to set off the cloak a bit.  For the crown I did a some experimenting.  Rather than painting it gold I did two coats of VMC Smoke over the white undercoat, and then added in some yellow for the highlights.  As the Smoke is translucent it really lets the white come through.  So not true NMM but it does look a bit metallic :)

Dungeon Saga Troll - base coat on flesh
Now I have the three trolls to do.  Not wanting to get bogged down on the larger figures I started with a VMC Green Brown and then did a AP Strong Tone/Dark Tone wash.  Next I will pick out the details (bones, stomach bits, ropes, etc) and see how it looks.

Did more coats of water effects on Inanis.  Getting there slowly.

Banshee training bust

I’ve been a bit stuck on what to do next.  I have a few 54mm figures I’m thinking about but just can’t commit to one.  I’ve had the training bust that Banshee (Alfonso Giraldes) made for a while so decided it was time to get that out.  The bust normally comes with a base designed so you can hold onto the figure while painting.  Very handy but it looks a bit odd.  So I cut that off and mounted the piece on a brass rod as usual.  However the first time I did this I got the angle wrong and had to remove the rod (heating the brass rod helps break the glue btw) and try again.  I will make up a simple wooden base later.

With Salute just gone Warlord Games were offering the Terminator basic set for 10 pounds.  I couldn’t resist and got a copy.  This triggered an episode of terrain making as I haven’t done any for some time.  Once a flocker, always a flocker.  I took two of my old 2x4 foot mdf boards that were covered with static grass paper mats, stripped off the paper and painted one side a mid brown.  Then I airbrushed over a variety of colours (dark brown, light brown, a few greens) to break up the brown.  I’ve done one board with the other to be done this week.  I also had five plaster rocks in the cupboard that I painted up the same brown and then dry brushed them and flocked them.  Almost got this terrain bug out of my system.

Monday, April 24, 2017

Ater Inanis base work and Dungeon Saga

This week was working on the Inanis base and some Dungeon Saga figures.  To try and make the water on the Inanis base as smooth as possible on the blends I used my airbrush.  I used teal and turquoise as bases and some dark blue for the shadows and white on the highlights.  I didn’t want much contrast, just some dark shadowing where the water spouts were going to be coming from.

Ater Inanis on base with water
Once the figure was glued on I glued in the water spouts with two part expoxy glue.  I didn’t used super glue as the fumes would fog the clear plastic that the spouts are made from.  I then started covering the base and the spouts in Vallejo Water Effects.  This make the spouts really sparkle and become much more water like.  The base is going to need many coats to get up enough for wave patterns to be seen.  I think I will add in some more fishing line mini spouts to stop the base from being so flat.  There isn’t enough height variation currently.

Dungeon Saga Ba'el


On the Dungeon Saga side I painted up Elshara and Ba’el.  Elshara seemed to be wearing gloves so I went for the whole opera outfit as something different.  We are currently playing the Return of Valandor expansion so I needed to get Ba’el finished so for once the main bad guy is actually painted before the party meet him/it.  Now just the three trolls and the troll shaman and all the base game and Return of Valandor figures are done.  Then onto the orcs (maybe).

Dungeon Saga Elshara


Monday, April 17, 2017

Ater Inanis part 3

Slow progress on Inanis again.  I think I may be a bit stuck.  Did some more detailing on the figure but I’m still stuck on what to do with the shoulder pad.

Water spouts test fit
Swapping to work on the base I played around with some different sized bases.  I settled on a small plastic jar with a screw on lid that I purchased from the $2 shop to store paint in.  I glued some lead to the bottom of the base and then glued in a large piece of wooden dowel to fill up most of the space in the jar.  Then I used some plastic card to form a mould around the top of the jar and poured in some Easycast resin.  This way the resin covered the screw thread and formed the top of the base making working with it easier.  I then sanded the whole thing and undercoated it black.
On base, millitput done
In the clear light of day I saw my sanding job was pretty poor.  So back to the shed and time to sand it properly.  To speed things up I drilled in a wood screw to the top of the base, cut off the top of the screw and then put that in the chuck of my drill.  Slow speed and some sand paper later and life was smooth again.  Recoated black and it looks much better.

Getting there..
I then mixed up some Milliput and made the top of the base.  I made it slightly wavy as it is going to be water.  I also spent some time with a scalpel scraping the top smooth and then sanding and polishing the Milliput (the advantage of that material).  So it’s now ready for painting.

Dungeon Saga Dwarves


I also finished off the last of the small undead figures from Dungeon Saga, the Dwarves.  Next up are the trolls.   Before I get to them I will probably do a few of the boss bad guys/gals.

Monday, April 10, 2017

Ater Inanis part 2

Inanis by Deadsculpt


This week was a bit quiet and on the Inanis figure it was more of the same.  I completed all the brown sections on the figure using VMC Leather Brown and VMC Vermilion as the base and highlighting up with white and VMC Lemon Yellow.  Shading was done with VMC Dark Sea Blue.


On the green skin I redid most of the upper body in parts trying to smooth out the skin and redo the initial shading as that was too harsh and quite jarring.  I also pushed the highlights on the top of the figure all the way to white.  For the shades I was more careful the second time using Vermilion and VMC Violet Red in the shadows.  I also made sure there was a transition glaze from the main colour to the shade to avoid an abrupt dark line.  Still not sure what to do with the eyes.

Water spouts
I’ve got the water spouts how I want them and now need to start working out the base as I need to have them glued in place before working on them any further I think.  Still haven’t done the cotton wool test (got busy making more foam weapons for the kids).

More Dungeon Saga undead
On the Dungeon Saga side I’m almost through the undead figure.  Just the dwarfs to finish off and then the three trolls.  Need to work out a way to paint them so I don’t take forever on them :)

Sunday, January 1, 2017

Christmas, New year, 54mm Cimmerian King (aka Conan) done and some Dungeon Saga

Hope everyone had a good Christmas and New Year.  I had a week off but that was for the kids (and shopping) so not much getting done there compared to the previous week off when I did all the work on Conan.

54mm Cimmerian King (aka Conan)

So first up I finished off my 54mm Cimmerian King figure by Andrea.  The last bit was fiddling on the base.  Everything was glued down with two part epoxy or PVA glue for the lighter items.  I added in a blood spattered dirk and broken spear to the base and made a banner from green stuff.

Best flesh I have ever done
The banner was done by rolling out very thin green stuff and then crumpling it into the desired shape and letting it dry.  Once dry I painted in a light purple to add some colour to the base (otherwise a very dull brown) and to catch the eye.  Finally I touched up the black edging and called him done.

Dungeon Saga Salamander
For a break between big jobs I did another Dungeon Saga hero figure, the fire breathing Salamander.  I tried out some Jo Sonja’s paints for the first time (they were cheap during a boxing day sale).  Very nice colours and they cover quite well.  However when they say matte paint, they really mean it.  I tried a bright orange for the skin and it was very orange, and the flattest finish I have seen.  More so than matt varnish.  So when other people have mentioned that the Vallejo paints are slightly satin in finish, I now see what they mean.  Like many things related to painting, it’s all relative.

Dungeon Saga zombie
Finished off three zombies from Dungeon Saga in the quick and dirty method.  Shouldn’t have gone with a brown for the pants and it blends too much.  Never mind, these guys die off pretty quick :)

1/35 Tamiya German 37mm AT crew
Next up in the “in between figures” will be another 1/35 German from the Tamiya 37mm AT gun set.  Really need to have a go at more 1/35 WW2 figures but just not enough time.  2017 will be the year of the Tamiya tank diorama (which I’m sure I will curse like the Violinist) I think.

500 pages!!
On Christmas Eve I found out that The Combat Company (just down the road from me) had the new FAQ Dioramas from AK in stock.  500 pages of diorama love :)  Always best to buy the Xmas presents you want.

Halo Fleet battles bust
Finally also at The Combat Company they had the “2016 Halo Fleet Battles Tournament” box on sale.  So for under $20 I picked up the set as it had two 1/10 (?) size busts in it (as prizes I assume).  I’ve assembled both and prepared them by undercoating them black and then doing white highlights to suggest shadow placements.  I’ll probably do the human figure first.

Halo Fleet battles bust
Four weeks to Cancon and I’ll probably take the Cimmerian King, the Amy Johnson bust and the Violinist diorama down to enter in the painting competition.  I was going to take the old Ral Partha (mini) Death Dealer but I don’t think he is up to scratch.  I love the figure but the others I’ve done more recently are better.  Maybe I’ll be able to do the 75mm version for next year.