Showing posts with label Reaper Bones. Show all posts

Monday, October 15, 2018

More putty work and a Dungeon Saga figure

So the putty work continued this week.

All ready for primer

Up first was the wing claw of the GW LotR Balrog.  This had been snapped off at some stage.  First up I drilled and glued in a paper clip shaped the rough curve of the other claw and then covered it in Milliput.  Once dry I carved this down to match the existing claw.  After that I sanded the Milliput with 320 and then 600 grit sand paper to smooth out the surface as the existing plastic claw is very smooth of course.

Redone claw
I then dropped the figure and chipped off the end of the claw.  So I switched to green stuff as it is more flexible and redid the tip of the claw (unfortunately not as sharp) and added in some more knuckle shapes, etc.  Calling it done at this stage.

Final thing was drilling and pinning the feet for attaching to the base.

Two joins only - take that Balrog
I also did a bit of green stuff work on some Reaper Bones figures I purchased to cover up the join marks.  Nothing major there.

I had planned to start priming all these figures but the weather has been too wet whenever I'm at home and the shed does get a bit cold and humid so decided to wait a bit.

Dungeon Saga figure
Finally actually did some painting and worked on the Kickstarter exclusive figure from the Dungeon Saga kickstarter.  Kind of need a small figure to get back into things after near two months with very little painting.

Tuesday, October 9, 2018

Milliput is my friend - GW Balrog work

Feed me hobbits!
This week went to town with the milliput on the GW LotR Balrog figure.  So much milliput.  Part of this was because the figure had been broken apart and bits had been snapped off, especially around the wings.  Part was because of the usual GW approach to cutting up figures for the molds.  No hidden joins under overhanging sculpted details to make things clean.  Nope, been spoilt there with new resin figures.  Just the good old 'slice off the pieces' and let the buyers fix up the joins.

Wings after glue
I pinned (using chopped up paper clips) and superglued (with Zap-a-gap) all the pieces together.  The arms were the easiest as they had sockets.  The wings originally did but the inserts had been snapped off and were still in the figure.   So drilling and pinning there.  The back flames had tabs so they didn't need pinning.  The head had nothing, just a smooth join so pinning was a must there.

Wings after putty work
...and some more putty


Original base glued inside the new resin base, pre milliput
For the base the figure came with a 60mm flat base, totally different from the usual GW lipped bases. So I went off to The Combat Company and got a 60mm resin base.  I glued in the plastic base inside to add some bulk and used more milliput to hid the edge gap.

Love this barn
I also put together the Renedra barn and have now glued this onto a piece of 3mm mdf.

Reaper Fire Giant
Finally I put together the Reaper Fire Giant.  Only one tiny seam line to fill in on this one :)


Monday, March 5, 2018

Klaus Copperthumb

This week I was working on Klaus Copperthumb.  I'm really liking these Reaper Bones figures.  The exaggerated 28mm scale compared to the old school Ral Partha 25mm figures makes them a bit easier to paint (for older eyes).  Plus they have some great classic fantasy archtype figures and are only $5.  I always wanted the nirvana of buying a single figure a week and painting it that week  (ie no pile of shame).  The bones range seems to meet that for me.  But to be honest I really should save some money and break out the older Ral Partha figures again.  I guess I've had the older figures for so long the interest level in them has dropped.  Plus the bones figures fit in nicely with Dungeon Saga.

Klaus Copperthumb by Reaper
Most of the figure went well, except for the cloak.  I was trying for a slightly purple grey but really failed to find the mid-tones for this.  My mix was

VMC Deep Sea Blue
VMC Red (small drop)
JS White

In the end I found highlighting up with white and JS Cadmium Medium Yellow didn't work as well as just using VMC BoneWhite.  The final highlights were just glazes of the Bonewhite on the top of the hood.  For shading I tried adding more red (to make the mix more purple) and Black.  That was less successful.


The shirt was more of a surprise.  My base was VMC Golden Yellow and a drop of AP Black.  Obviously the AP Black is pretty high on the blue scale as I ended up with a great looking green.  Highlights by adding yellow, shadows by adding some VMC Violet/Red.

The armoured belt base was VMC German Medium Brown and Black.  I highlighted strongly with the Bonewhite and White which worked out quite well.

I worked on the spacecraft for my Ex-manus void suit figure.  I have a nice idea of a "working outside the space station" in mind.  I used resin in a plastic cup to cast a rounded hull shape, which I then glued various bits onto to 'junk it up' a bit.  Looks really cool.  I undercoated it and then...sad face.  Looks like the resin has gone off as although it set fine it seems to be weeping sticky oil which means the paint can't dry.  I've had this once before and there was no solution.  I suspected the resin was not 100% as the colour of one part of the resin (I use Easycast) had gone a bit funny but hoped for the best.  So now I've cleaned off the whole thing with kerosene and will leave a day or so before trying the repaint.  If this fails again I'll have to start again (and probably chuck the rest of the remaining resin).

Maybe next week?
So up next probably won't be my void suit guy.  Instead maybe a Stormcast Eternal and try something different on him.  I've got 5 of them so I'm using them as test figures (ie not of any game and probably not good enough for display).  I'm also wanting to do a bust again or a 54mm figure.

Monday, February 26, 2018

Living Nightmare and Klaus CopperThumb

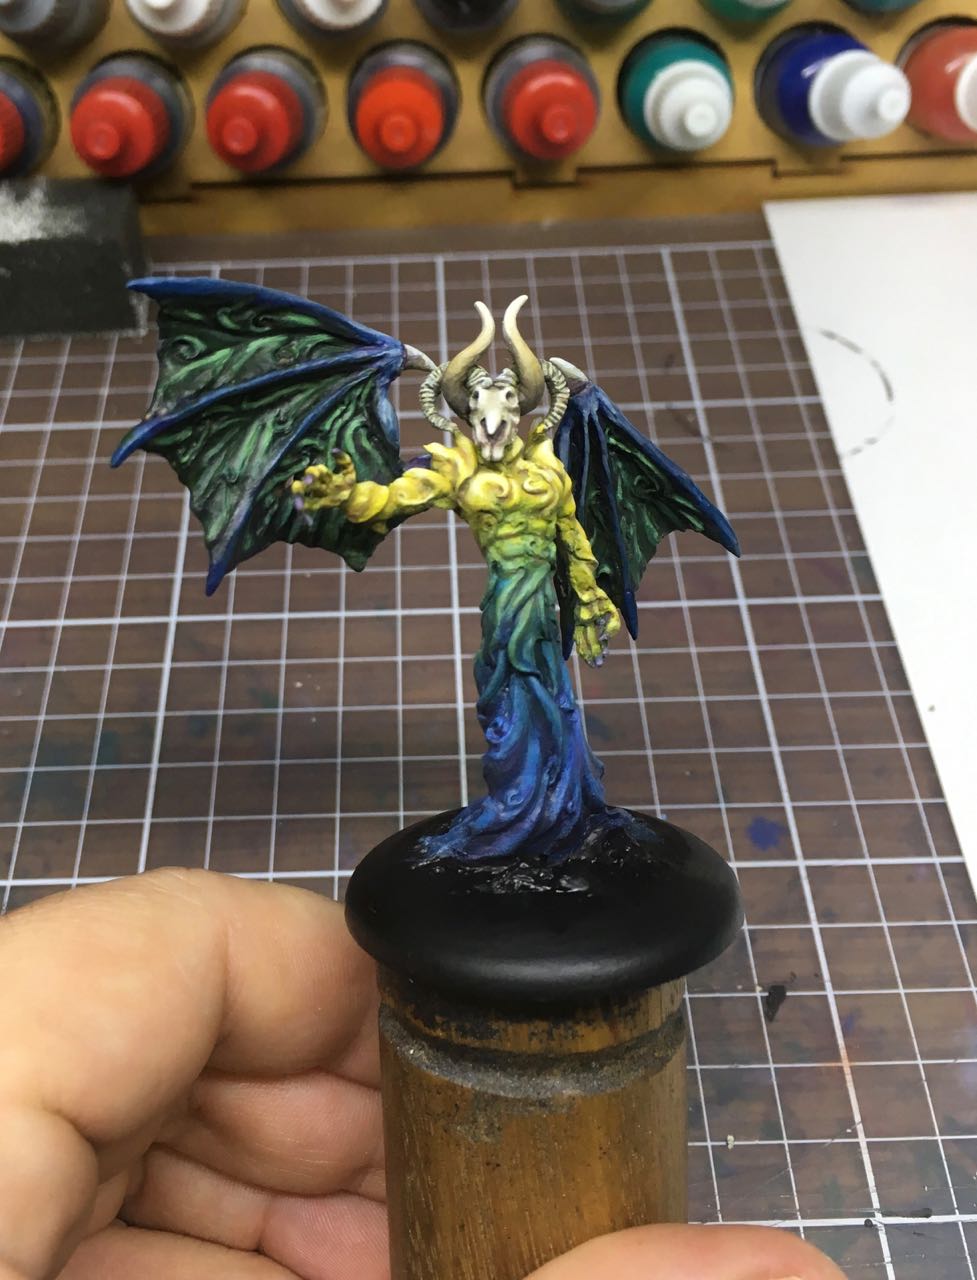
So this week I tried the wings on the Living Nightmare figure from Ex-manus.  Or more correctly I tried the wings three times.

Attempt one
For the first attempt I went for a yellow/orange look.  I used Leprous Brown and JS Cadmium Mid Yellow and VMC Bright Orange.  However I couldn't get enough contrast between the body and the wings and they all kind of blended together.

Scrapping that I went for a purple scheme (sorry, forgot the photos).  Got some nice shading going on but the wife mentioned that the purple didn't match with any of the other colours on the figure (and she was right).  After some more sighing I had a third attempt.

Living Nightmare by Ex-manus
For this one I went with green to tie the wings into the mid body section where I use an aqua green for the blue to yellow transition (kind of a mutating body change).  I started with a very blue/green mixed from the VMA Blue and JS Cadmium Mid Yellow.  However as I shaded up I went for a more standard green by adding more yellow (and then white) to the mix.  I kept adding a small amount of blue to keep tying the mixes back to the base coat.  For the shading I add some VMA Red and VMC Violet/Red to get a rich very dark purple.  This mix I think worked.


Along the way I also decided that the head wasn't right.  I decided to do the head as bone and the same for the horns.  This makes the focal point of the head also the brightest point on the figure.  I attempted the Ben Komets loaded brush technique on the horns.  I had distant glimpses of success :)


I have realised that I'm not glazing as much any more.  I think this is a bad thing.  I'm highlighting and shading but forgetting to go back and do the transition blend every 3-4 coats.

I was going to put this figure on a wooden base, but in the end went for a 40mm lipped base.  He didn't quite work out for me.  I big part of that was insufficient planning.  I need to go back and do the colour charts for the mixes I want to use before starting the figure rather than work it out on the fly (and have 3 attempts like I did on the wings).  I use to do this to really work out how to get the blends working.  It also meant I could see all the colours together before they went on the figure.

Klaus Copperthumb


Finally I started the face of the new Reaper Bones figure Klaus Copperthumb.  He is this weeks project.

Sunday, February 18, 2018

Started painting again (at last)

So got back in the groove this week with painting two figures.  The first up is "Baron Meliadus of Kroiden" from Eureka Miniatures, part of the Hawkmoon range.  Who doesn't like the Order of the Wolf?

Baron Meliadus by Eureka
As an experiment I decided to play around with painting in grey.  My idea was a black wolf cloak.  However rather than have the head black I lightened it up considerably to make the head/shoulders the focus area of the figure.

On the cloak I tried creating texture where there wasn't really much there to begin with.  By doing what was close to pointillism I slowly added in "waves" of highlights to try and mimic the flow of fur.  Under these highlights I then shaded to make the highlight appear to be higher from the surface. It worked a bit, but would need a lot more to really start to come together.  The good news is that I tried a new technique and it kind of worked.


For the armour I got a bit muddled and was alternating between NMM and TMM.  I stopped before I made it worse.

On the shield I tried for some more extreme contrast.  Getting better there but I'm struggling as my colours keep dulling down.

Living Nightmare
The second figure I worked on was the "Living Nightmare" by Ex-manus who has been sitting around for some time now.  I finally got some colours in my head to use on him/it.  I'm going for violet blue on the lower section, yellow on the top and brown/orange on the wings.  Pretty much blue and it's two complementary colours.

For the blue I started with VMA Blue.  I shaded down with Liquitex Purple ink added to the blue and then added some black for the final shades.  Later I went back and added some old Citadel Leprous Brown into the mix as orange is the complementary to blue.  This is the push the colour contrast a bit more.  On an aside all the Citadel paints I have remaining are the oldest ones which came in the hexagon flip lids.  Anything new than those have all dried out.  Highlights were done by adding in white and more blue to stop the mix chalking out.

On the body I used Leprous Brown, JS Cadmium Mid Yellow and white.  Shading was done by adding some of the blue to green the mixture slightly.  For the area between the body and lower area I did some intermediate glazes to try and ease the transition between the two areas.

Klaus Copperthumb from Reaper
Finally I found a nice Reaper Bones figure "Klaus Copperthumb" which I thought would suit Dungeon Saga really well.  I trimmed off his base and glued him onto a Dungeon Saga base and sculpted up a small money sack to sit behind him.  Another "just for fun" figure.  I need to just paint more and stop taking 3 months to paint one figure hoping that it is competition standard.  I learn a lot more from 5 smaller 28mm figures than one 54mm figure.

Next week onto the wings of the Living Nightmare

Monday, January 8, 2018

Reaper Antarctic Explorer part 2

Reaper Bones Antarctic Explorer
Sometimes the paint just flows and it did last week.  I pretty much polished off the Antarctic Explorer figure.  Everything just worked out well and I really liked the way the snow effects came together.  Having documented this previously on this blog (part of the Prince of Novograd figure) also helped as I didn't have to re-invent the wheel.  I did add as a final step the 'Snow Microballoons' by AK.  These are really nice and make a great gentle fine snow cover.


On the figure some of the colours I used (I'm finding I'm using more Jo Sonja's paints every figure)

Pants - VMC Black/Grey + VGC Beastial Brown
Shaded - VMC Dark Sea Blue / Black
Highlights - JS Orange/white
Jacket - JS Hookers Green + VMC English Uniform.
Shaded - VMC Red and Violet Red.
Highlights - added English Uniform, Yellow, White
Jacket lining - white/yellow, shaded down with VMC Smoke.  Point highlights with white
Belt - VMC Black/Grey + English uniform
Gloves - Black grey, highlighted with JS Warm White
Gun Strap - Beastial Brown + Black
Highlights - orange/white
Backpack - VMC Red/Black/Brown
Shaded - black/brown
Highlights - Brown, white
Snow Shoes - VGC Leather Brown


Really happy with the jacket (the Hookers Green is very much like the old Citadel Dark Angels Green) and the backpack (even though it gets covered with snow).


After the figure was done I glue it down and used some more modelling clay to blend the figure base in.  Normally I would cut off the integrated figure base but couldn't in this case as the figure base had the snow shoes sculpted in it.


Originally I didn't have the bag on the base, but the composition looked a bit lacking without it.  Luckily the wife reminded me to put in footprints.  I was going to do them, but kind of forgot.  I also added on some snow material to the top of the figure.  I find people go a bit too heavy with snow on figures.  Anyone moving around will naturally shake the snow off themselves so it should really only build up in catchment areas (brims of hats, cuffs, etc).  Not the huge lumps the size of your head on each shoulder.

Sunday, December 31, 2017

Reaper Spirit of the Forest part 5 and Reaper Antarctic Explorer part 1

Spirit of the Forest
So with the holidays fun and games been a bit patchy with the blog posts.  However good progress has been made. 


I finished off the Spirit of the Forest figure.  Final steps on the base included

- brass etched ferns
- water reeds in the pond, then Vallejo Water Effects to add some ripples to the pool
- redoing some of the grass to add some different tones
- painted a butterfly (hand made from paper)
- made some Old man's beard from steel wool.  Originally painted green and then lightened on the figure

Butterfly cut out


On the figure I varied some of the green areas as most of the green was too uniform in tone.  I did this by using Jo Sonja Hookers Green and Pthalo Green to darken and cool some of the lower greens.

Steel wool vines

I did a bit more on the OSL, but not much.  Then it was just gluing the figure to the base and repainting the sides of the base to clean up any over paint.  Calling it done.

Butterfly in (fuzzy) detail

Then it was onto the Reaper Bones Chronoscope Antarctic Explorer 28mm figure.  I saw this one in my LGS and really liked it.  Something quite different in genre.  I cut off the rifle barrel and replaced it with a plastic rod.

Reaper Antarctic Explorer


I had a strong idea for a base of a ruined building in the background to give a "end of the world" vibe.  The figure being more a survivor than an explorer.  With that in mind I wanted muted colours and worn clothing.

Wall painted and window frame done


For the base I purchased a sheet of pre done plastic card brick work.  I cut out a window and used plastic card for the framing and clear plastic sheeting for the glass.  I cut up some more plastic card to make the wooden planks.  I tried the method of scoring the plastic card with a razor saw to make wood grain.  It worked a bit but not enough.  Need to give that another try and be more violent in the application.

Fire damaged wall


The ground work was built up with some DAS modelling clay.  The snow effects will be added once the figure is in place.

Painting the wall I used Vallejo German Red/Brown primer as the base coat.  It is a near perfect red brick colour off the bat.  I then added some lighter and dark coloured bricks to break up the wall.  I went for a mix of approx.

- 40% base colour
- 20% one step lighter
- 20% one step darker
- 10% two steps lighter
- 10% two steps darker.

The mortar was VMA Light Brown.

The wood planks were Bestial Brown + Black as a base and then shaded as usual.  Once everything was glued together I used my airbrush to add some smoke damage.  First VMC Black/grey and then VMA Black.  I find straight black too much normally.  I then painting in the graffiti ("No Food").

Next time the figure.

Monday, November 13, 2017

Reaper Bones Spirit of the Forest

I worked a little bit on my next figure, the 'Spirit of the Forest' Bones figure by Reaper.  Most of the work however was on the base.

Spirit of the Forest by Reaper
I want the figure in a woodland scene but don't want to have any full height trees of the base.  They would be too big and dominate the small base.  Instead I've added some fallen trees and stumps to the base.  The two stumps are resin pieces and the fallen tree is a home cast I did awhile ago of a nice looking stick that had enough texture that it would still look ok at scale.

Base - white area is where the feet go
I also plan to have a small water feature/pond at the front of the base.  Adding the water effects (I will probably use casting resin) will be done last.  Currently at this stage I have glued in some rocks and coated the wood with PVA to avoid the resin seeping into the wood.

For the ground cover I used DAS modelling clay with a layer of PVA glue underneath.  While the putty was still wet I added a layer of PVA glue on top and pressed in some home made scatter material (coloured sawdust).  I wanted to use this over the usual sand/rock mix as I wanted a dense undergrowth look.  This will be further painted.  For now I just some some washes to make sure all the white from the DAS putty was gone.

On the figure I did a rough base coat of Jo Sonja Brown Earth, Burnt Sienna, Raw Sienna and white lightening the mixture as I went up the figure.  I will paint the figure in parts due to the size of it.  So far I have painted one leg with the wood details and some of the greenery and mushrooms picked out.  For the green areas I have been using JS Pine Green and Sap Green.

I'm finding painting some areas quite hard due to the arms of the figure being in place.  I don't really want to cut up the figure so a bit of rough painting (which can't really be seen) will be needed.

Sunday, January 29, 2017

Cancon 2017 and Crystal Dragon

Well Cancon is over for another year.  I failed to place with any of my entries in the Crystal Dragon but my daughter not only got a Gold in the Hatchlings (Junior) section she also got Best in Show!  The Darth Vader quote “The circle is now complete. When I left you, I was but the learner; now I am the master.” seems rather apt.  At least she was nice and asked “When are you going to win an award daddy?”.  Pictures of the mermaid piece, award and prizes below…

Mermaid in the sea - Gold award
Hatchlings Best of Show

Prize pack

The second hand store was run differently this year with staggered entry which I think worked out ok.  The horrible crush from last year was missing thankfully.  I also scored pretty well.  There were also some great purchases to be had however I already had the items in question.  This means I’m getting older and my classic cool games are now moving into the “old crud no one wants” category ;)

Second hand store purchases


- Urak-kai scouts $18 - Always wanted these to add into my existing force.


- Gondor Knights $22 - I’ve got one box already so now I have enough for a decent size force (5 calvary figures alone don’t do much in LoTR I found).


- Gondor bolt thrower x 2 $12 - Only wanted one but at that price why not.

There were a number more LoTR box sets but I resisted.  It was hard.  I’m sure I’ll regret it later.  Maybe I did need another 10 wargs..


- Divine Right $10 - I purchased mine for $70 off eBay many years ago :(  This will be gifted to a friend who remembers the good olde days.


- Reaper Bones Wyrmgear dragon $15 - Clockwork dragon for $15, why not.


- Ex-Manus Explorer in Void Suit $3 - Really like this figure and can see a sea (narf) diorama with it.  Plus I saved $5 over the normal price!


Purchased


- Ex-Manus  Sinister Suit  - love the Cthulhu head on a carnival ring master.


- Reaper  Bones animals - animals good.  Just because I could really.


- Eureka Miniatures  figures - Count Brass and an Order of the Wolf from the Hawkmoon range.  Love the wolf figure.  Some more animals as I wanted some lions for my gladiators and some ravens for the Mr Sinister figure.


- Rowboat - cute little mdf rowboat from Battlefield Accessories  Some great stuff there.

I also got some more Reaper Bones for the kids (Son got some skeleton archers, the daughter a female wizard and a female rogue) and some mdf buildings from Knights of Dice for them to make as they have been enjoying playing with the existing 28mm terrain I have.