Showing posts with label Doom. Show all posts

Sunday, February 22, 2015

J’s Work mold painted and more Doom figures

Road, 


So this week I’ve done a quick test paint on one of the J’s Works molds, the “Cobblestone Pavement (large)”.  The piece had some air bubbles hence why some of the rocks have holes in them.  I started with some VAC dark ochre and then washed the entire piece with AP Dark Tone.  That was then dry brushed up with VGC Earth and Khaki with some off white added to the final coat.  Not happy with the result I decided to experiment with some oil paints for something new on terrain.

road

I tried an oil wash of Burnt Umber and some black in-between all the rocks.  Then I highlighted up the rocks with some burnt sienna and yellow ochre.  Unlike dry brushing instead I painted on the oil paint and then used a paper towel to dab off most of the paint.  This was repeated a number of times.  A few more washes and some grey dry brushing/dabbing and it was’t looking too bad.  For a diorama piece I would continue with some pigments.  For a playing piece this would be as far as I would go.  I’ll let the oil dry for a few days and see if there is any transfer as I’m afraid the oil paint won’t be safe around playing figures.

and more road


Continuing the Doom marathon I got the six Revenants done in the quickly bake method of washes and dry brushing.  The base coat was VMC Golden Brown, washed down with AP Soft tone followed by Strong Tone.  I dry brushed up with Golden Brown, Yellow and Off white.

Revenant

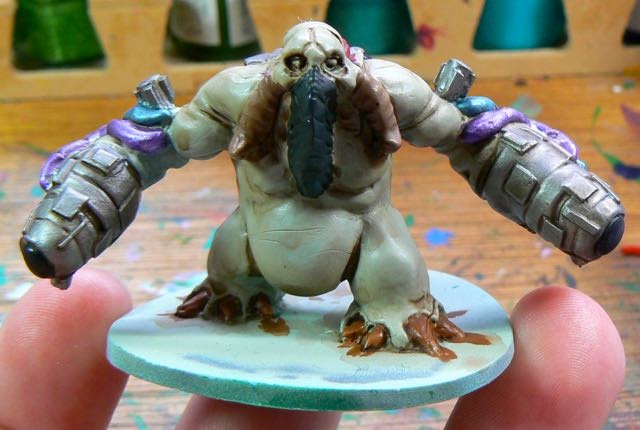
Also three of the Mancubus figures are done.  However the base coat of paint has gone on super smooth for some reason and no other paint seems to stick to it.  So the painting for these figures isn’t going well.  I’m pretty much putting on coat of paint on, watching it bead off and then trying again.

Mancubus

Finally I've put together the 54mm knight I purchased at Cancon.  He is very static in pose so I'm trying to find some 54mm bare heads to swap out the helmet for.  However the few places that have them all seem to be sold out.  So he might be waiting a bit more.


Sunday, November 30, 2014

El torres and Doom figures update

He should really wipe
Over the last week or so I’ve been working a few projects.  First up is the slowly progressing Doom figures.  The Mancubus figures have now had all their base coats done.  I decided to use some of the various metallics I have as painting mainly Dark Ages figures you don’t have much need for metallics outside of chainmail.  Plus the paints are all starting to go hard.  With all the base coats done I experimented with a coat of AP Soft Tone.  I will probably go for another layer of either strong or dark tone on the gun arms.  Then the final highlights.

Hard to pick your nose with those hands
For the El Torres base I have some broken column resin pieces (from Secret Weapon) which I though would be more interesting than the original table idea.  I have about a dozen pieces (they came in a set) so I tried a few different marble type effects.  However the columns are not smooth, but rather very coarse.  So all the heavy wash technique most people use for marbling didn’t really work.  The washes kept running into the cracks.  Instead I might try and paint them as sandstone which would suit the texture of the column better.

The un-shaded armour looks quite bad now
On El Torres I have been working on his face, collar (last week), pants, boots and shirt (this week).  The pants have worked out very nicely and I’m quite happy with the result.  My dark to light colours were

VGC Beasty Brown
VGC Leather Brown
VMC Golden Brown
VMC Tan yellow

For the purple socks I used

VGC Black
VGC Hexed Lichen
VMC White

The pant studs were done in Citadel Gun Metal.


For the boots/shirt my dark to light colours were

VGC Black
VPA Shadows Flesh
Citadel Blood Red (the very old tall hexagonal bottles range)
VGC Orange Fire
VGC White

For the green shirt puffs I’m not 100% on them yet.  The silver buttons don’t work.  Colours were

VGC Black
AP Angel Green
VGC Dark Green
VGC Sick Green
VGC White

I might try and redo the silver in a gold to tie that area back to the pants.

The face was

VPA Shadow Flesh
VMC Medium Fleshtone
VMC Dark Flesh

The collar was Citadel Bleached bone shaded down with VGC Earth and highlighted up with white.  All those frills and folds took a long time to get done.  I did the face first as I needed that to be right before going further.  If the face is wrong on this scale, the rest of the figure is pointless.

So now I have the ammo strap and the armour to do.  I think I will do the smaller arm and leg armour pieces first to see if my chosen technique works in the larger 54mm scale.  Plus that large breastplate is intimidating me a bit.

Sunday, November 16, 2014

Doom figures and El Torres

Mancubus needs some Fitness First time
Been a quiet week on the painting front.  I started on the six Mancubus figures from the Doom boardgame late in the week after undercoating the figures and doing some preshading.  So far all I have done is the basic flesh and the start of the details (guns, claws, nose).  I went for a light green/grey look which I then highlighted by added more grey and white to the mix.  All these colours were airbrushed to save time as the figures bigger than a normal 28mm figure.  Hopefully over the next week or so I will finish of the base colours and start the washes.

The big belly undead
The Doom zombies were finished off.  These were another quick and dirty "three colours with washes and highlights" job.  For the twelve figures I did 4 each in blue, brown and green jackets just to add some variety.  Even on Mars you need safety orange stripes on your clothes :)


After staring at El Torres for the week I finally got started and got the base colours down.  The green will change as the current green is just the under layer as the final green I want to use doesn’t work over white.  It’s just too thin.  The armour also just has the black preshade so far.


Using a similar scheme to my recent Wood elves I put down all the initial colours.  I find I need to have all the white covered before I start painting further.  I see a lot of online pictures where other painters work on one part to completion and leave the rest of the figure undercoated.  I find that  throws off my colour sense (what little I have).  Just too orderly in my ways.


I’m pretty happy with the colours and really like the light purple next to the golden brown on the legs.  I might change the boots as they are the same colour as the shirt which may be too much sameness in the figure.

In parallel I will also been thinking about the base.  My initial plan is to make a diorama where he (El Torres) is next to a table or something similar with some food on it and his shotgun is resting on the table as well.  Like he is waiting for someone, but waiting in the open.  His facial expression is one of world weariness and I want to align to that.  I recently got some 54mm scale food items and plates which I think will work well.  Of course it’s going to help if I get the figure finished first.

Sunday, September 28, 2014

Doom figures from the board game

As the title of this blog would suggest I try to paint two figures a week.  This first came about trying to do two Saga war bands and after three months not much progress had occurred.  So I set myself the realistic quota of two figures a week and after many months  my Anglo-Danish and Viking war bands were done.  Most of the posts on this blog will be terrain related as my painting isn’t that great and there are much better pure painting blogs out there.  However I will throw up a few painting posts along the way.

I own the Doom board game by Fantasy Flight Games.  It was $30 one year at Cancon and had heaps of cool looking figures so it was an easy purchase to make.  The game plays quite well and the figures are very good.  They are in a single colour and made of a hard(ish) plastic.  Since I had finished off my Scots Saga war band I wanted to try something different on the painting side.  Too much green and browns in the dark ages.  These figures looked nice and since I already had them I thought what the heck.  Also I wanted to trial pre shading with my airbrush and try some more zenithal  painting techniques.

For the larger figures I would be taking some time to try out new techniques (and the train up in them).  For the smaller figures since there were 12 identical figures I got a bit more pragmatic and used the magic dip and dry brushing to speed things up.  After all I only play 1-2 games a year of this.

After scraping the mould lines and washing the figures I undercoated them white, and then pre shaded them in the zenithal style.  So white was splayed (via airbrush) from above and black from below.  The only snag on this was the base of the Hell Knight was quite large and made it hard to get a decent spray from below.  That done I painted the figures as below.

Trite

Trite
VMC Green Brown and then washed with AP Soft tone followed by Strong tone.  Then a dry brush with the Green Brown again lightened with VGC Iraqi Sand over a few successive highlights.  The eyes were done GW Warlock Purple and the mouth GW Scab Red.  The figures are normally one of three colours (to match the three colours each player can be).  Since the Trite doesn’t have a base that you can check the underside of to determine the original colour a small spot of colour was painted on the body of the Trite.

Demon

Demon
The front body was VGC Parasite Brown washed with AP Soft tone and dry brushed with Parasite Brown lightened with VGC Leather Brown.  The back body was GW Gun Metal washed with AP Dark tone with a few bits painted brass/metallic blue for bling.  Dry brushed with  GW Gun Metal and Chainmail

Imp

Imp
One of the easiest figures as it is all one colour.  The body was done in VGC Leather Brown and washed with AP Soft tone followed by Strong tone (notice a pattern yet?).  Then it was dry brushed Leather Brown and VMC Iraqi Sand.  The 8 or so eyes were done in GW Blood Red and the claws were done in layers from pale brown/Iraqi Sand/White.

Hell Knight

Hell Knight
This was one of the figures I wanted to spend the time one.  Nothing but one mass of skin so a real learning exercise in smooth shading.  Being a bigger figure I used the airbrush to do the first highlights.  The base colour is VPA Shadows Flesh.  This was then highlighted by adding GW Blood Red and then VGC Orange Fire.  The pre shading worked a treat as the underside was pretty much done.  Then there was redoing the top of the figure and adding the shadows back to the skin (Shadows Flesh and Black mixtures) creases and general tiding up.  The teeth and claws were done with GW Bleached Bone and VGC White and the eyes a metallic orange.  Very happy with the end result.  Now just have to do 5 more.