Monday, June 5, 2017

Banshee Anonymous bust part 2

Pretty much more of the same this week.  I continued to work on the Anonymous bust, working my way around the model and fixing areas up.

Banshee Anonymous bust

First area that needed some work was the back.  The left shoulder blade needed to be made closer to the right shoulder.  Also the lower back area needed the contrast pushed a bit more.


The left side of the neck proved to be the hardest area.  My original attempt had resulted in a very purple skin finish.  Also the hollow areas were much too stark and continued too far up the neck to the head.  I had a very big inverted V on the side of his neck.  This got repainted at least half a dozen times as I just couldn’t get the colour where I wanted it.  Always too purple or too brown, loosing all the orange tones.    In the end I found using VMC Dark Sea blue instead of VMA Armour brown as the shade colour seemed to work.  I think I’m almost there now.


Under the scar area on the left side of the head I put some normal flesh colour at the base of the neck.  This helped define the area and stopped the shading in the hollows of the neck from continuing all the way up the head to the scar area.  The scars were worked on and I added some more dark red/purple shadows next to the flesh lines to make them pop a bit more.


The wife mentioned that the hair stubble didn’t look different enough from the flesh.  So I took the contrast a bit further.  I used very small dots of colour (both the shadow and highlight) over the stubble area and then with a wet brush sumped the dots out much like you would with oil paints.  You have to be quick as the small dots dry very fast.  I used the same technique on the beard.  I probably should have used the flow medium I have to help out there on second thoughts.  The main hair got some more highlights.

Lastly I glued the figure into the base before the final finish up tasks.

This week more touch up work and trying not to ruin things by over fiddling them.

Monday, May 29, 2017

Banshee Anonymous bust

Anonymous bust by Banshee
The Anonymous bust done by Banshee (Alfonso Giraldes) was the first bust that I purchased over a year ago.  It’s been sitting in the draw waiting for me to get brave enough to try it.  I found the expanse of flesh (and nothing but flesh) quite intimidating.  I decided to start it about five weeks ago and it just sat on the desk.  Proverbial mental roadblock.  I just couldn’t find a way to start it and didn’t want to do it badly.  So it sat unpainted.


Finally this weekend I just dived in.  I used a number 2 flat brush to just get the paint on quickly and to sketch out the rough shadows and highlights.  I found that using the flat brush really enjoyable as it had quite a good point (chisel tip?) and I could use it to do some fine lines as well.  In the end I had to stop as I was doing wet on wet (on wet) and paint was lifting off and leaving bare patches.  The end result was pretty rough and rather orange but I had started.


On the next session I pretty much repainted most of the figure and started getting the colours right and trying to get the blend areas smoother.  I’m keeping the paint very thin for the most part, trying to build up layers to give the skin some depth.  I did the eyes as not having them done was throwing me off.  I think they may be a bit bright however.


On the left side of the face the check groves ended up becoming three scars.  They aren’t really sculpted that way but I used some darker colour to suggest the scars.  I then got the idea to continue that theme and made the left side of the head scarred/burnt as well.  I’m alternating the colour areas by using dark red/purple for the damaged flesh areas and the skin highlight colour for the scar area.  So far lots of glazes used to give some depth.  Unfortunately I’ve made a pattern and need to break that up so it looks more random.  The brain just loves uniformity.

The hair I went for a ginger/orange.  So far it seems to be working, but I have to be careful that the highlights don’t go pink and stay orange/yellow.

So much mixing
Before I started it did a couple of test mixes to try and get the flesh colour sorted using Jo Sonja paints.  I’m really liking just working with basic colours and doing mixes.  Rather than make up a pot of flesh colour (like I did for the Cimmerian King figure) I deliberately didn’t.  This forces me to mix every time and get the mixes consistent.  Hard to do but it’s the only way I’m going to get better at mixing.  I find my flesh mixes always get a bit yellow as I don’t add enough white to begin with.  However I also found that a dot of purple in the mix helps a great deal in neutralising the yellow.  The colours I’m using are

Jo Sonja
Raw Sienna
Burnt Sienna - more red than brown I find
White
Light Yellow
Cadmium Scarlet
Napthol Crimson
VMC Violet Red
VMC Dark sea blue

The basic flesh mix is raw sienna, light yellow, white and spots of orange, red and the violet red.  The highlights are more white and yellow and orange, the shades more violet red, burnt sienna and red.

 My custom Jo Sonja paint holder :)
Going forward I need the scars to more pronounced and the base of the neck and back need work.  I’m really happy with the cropped hair fuzz on the right side of the figure.  I think the forehead may be a bit yellow.  I’m wondering if the green of the cutting mat I have in my painting area is throwing me off slightly.

Finally keeping with tradition I did another Dungeon Saga Troll.  One to go.

Monday, May 22, 2017

Milliput is my friend

So a week of bits and bobs.  With my two new busts I wanted to get them ready for painting in the future.  So this meant time for the putty.  In the end it needed two goes to get all the holes filled.

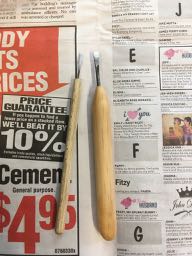
Home made chisels
Firstly I trimmed down all the mold lines on the busts.  My new micro chisels I made recently worked great.  Rather than trying to scrape a mold line (very hard across hair for example) instead I could just cut off the line straight on, a small bit at a time.  The little 2mm chisel was great.  Wish I had made these years ago.

On the large roman figure there were a number of small holes/negative bubbles to be filled in.  On the back of the figure an edge had been broken off (about 4mm x 1.5mm).  This also had some stitching pattern on it so after I had built up the area I got a second thin roll of putty and lay it down and then put in the pattern.

For the smaller celtic bust there was a major negative bubble at the bottom of his cloak.  There were also a few gaps between his arm and body.  Finally on his helmet the edge banding was missing from approx 25% of the rim.  Some very thin putty and deep breaths were needed to get that fixed up.  It’s very hard to get the putty to stick on initially when it is that thin without squishing it down flat.

For larger scale figures (like busts) I prefer to use Milliput (standard) over Kneadatite aka green stuff.  As Milliput goes very hard it can be scraped and polished.  This is essential for repairing a cloak for example where you need to have the repaired putty section as smooth as the other adjacent areas.  After putting on Milliput to an area I first smooth it down with a sculpting tool.  Once the area is looking right I then use a damp paint brush to remove any tool marks.  After the Milliput is dry I then will usually scrape the area (if possible) with a scalpel blade.  I also make sure I scrape some of the surrounding resin area to ensure both the resin and the Milliput are the same level (i.e. no step up/down).

For smaller areas I like to mix Milliput and green stuff 50/50 as is easier to work with but goes reasonable hard unlike green stuff by itself which stays very rubbery.

Preshaded figures
I undercoated/preshaded all the Terminator game figures and both the busts in the usual black then white highlights.  I was thinking about spraying the terminator figures with a metallic coat but decided that to get full coverage of the figure I would end up loosing the preshading as there are a lot of nooks to get the paint into, which means a number of spray coats to get them all.

For the busts I drilled out a hole in the bottom for mounting.  I need to work out their bases next so I can cut and glue in the right size of brass rod.  I don’t like to be gluing and measuring up bases once the bust is painted.  Late in the weekend I went and got some more wood from the hardware store around the sizes I think will work.

Underground entrance

Tunnel entrance

Rough ground scatter
I did a bit more work on some pieces of spot terrain.  Two underground entrances and a small area of rough terrain.  I think the rough terrain may end up being for LotR or Saga.

More troll love, with pre shade highlights
Lastly did another Dungeon Saga troll.  Only two more to go then the base set is all painted :)

Sunday, May 14, 2017

Terminator Genisys and other bits

Defenders of justice
Work was a killer this week so just did stuff on the weekend again.  Trying to get back in the groove I made up the figures for the Terminator Genisys game.  These are designed for younger players and are all (slightly) snap together (although I used glue) and the base/legs/body are one piece.  There are two terminator bodies with two weapons combos.  So not much variety there when you have to make ten figures.  I did a few head moves (cutting off the head and repositioning it) and converted two figures.  One became a command unit (with some aerials on it’s back and one got two guns (it borrowed a gun from the humans).

Crawlers
The five crawlers I glued onto bases and gave one a knife just for variety.  They never stop!

So many pony tails
The human figures have four body types, with seven arm options.  However one figure is restricted to only two weapons.  The arms are only designed to go in one position but if you slice off the tabs on the body that the arms fit into you can reposition the arms.  A few figures lost their ponytails and one head got moved.  Unfortunately the figures are very slim and the heads are tiny.  So I couldn’t use any of the spare heads from other plastic figures I have.

They just need a bit of putty work and then off to be undercoated.  I need to get back into the habit of painting during my lunch breaks at the LGS which is only 5 minutes away.  A great way to churn though figures like these.

Preshaded Dungeon Saga troll
I started Dungeon Saga troll number two, trying the pre highlighting and then AP Strong/Dark tone washes.  Looks much better with pretty minimal effort, so happy with that experiment.

Tamiya AT gun crew
Finally did a bit more on the WW2 German AT crew member.  Forgot how to paint flesh and had to relearn that.  I always end up too brown on the first attempt.  I’ve resigned the AT gun and crew to the experiment list given the time I’ve taken to do them.  It also subconsciously takes the pressure off knowing that they don’t have to perfect, rather I just need to learn new techniques from the project.  Next up is the AT gun itself so more experiments here.

Roman bust, aka terminator god
Finally two second hand busts arrived.  Unknown manufacturer on both.  The Roman is lovely.  The face is just superb.  The Celtic figure is good, but the hand is the wrong one!  The figure needs a right hand, but the one supplied is a left hand.  It will be hidden by the shield so I might get away with using it.

Celtic bust


Monday, May 8, 2017

Slacking off and a model show

Pretty much just slacked off this week.  I finished off the second Terminator board so those are now done.  I tried to do some of a WW2 German AT crew figure I have but didn’t really do much.  Some weeks the painters block sets in hard.  There is the desire to do some painting but when you sit down there just isn’t any energy.  Then the regret of not painting hits and you start to wonder why you bother.

I rallied late in the weekend and managed to finish off an undead troll from Dungeon Saga.  For the second one I will do some more pre-highlights on the top of the figure as this one was a bit too uniform in tone.  However the two tone AP wash (Strong Tone, then Dark Tone) worked out pretty well for quickie paint job.
Inanis

Inanis got some more water effect coats, getting there.


Also made up the base for my Banshee bust.

On Friday night I found out that the IPMA show was on over the weekend.  This is in Wollongong but only takes me approx 45mins to get there.  Pretty much the same time as to get to Parramatta where the Sydney model show is normally on and I don’t have to fight city traffic and parking.  So the wife and kids all came for the drive and we did a few tourist things in Wollongong afterward.  The bring and buy was excellent and I purchased a few things.

- Building $15


A vacuum form building.  Even better two spures of the building accessories.  This includes lamps, fences, light posts, etc.  Diorama gold.

Accessories

- German mounted infantry - $5


Germans on horses, why not

- 1/24 68 Shelby Cobra - $5


Missing all the clear parts (i.e. windows, lights).  I’ve never made a car kit and always wanted to.  However the $40 for a new one was more that I was willing to do for a “just because” feeling.  However at $5, bargain.  Plus if I totally muck it up no money lost.  I’m thinking now of a diorama of a car being worked on in a garage (to cover for the lack of windows), rust effects, oil stains, etc.  I already have a 75mm figures from the set of railway figures I purchased for the kids to paint.  He wasn’t quite good enough for a standalone figure but in a diorama he should be fine.  Another bucket list item underway.