Sunday, December 13, 2015

54mm Samurai arms and display base work

Serious air guitar
Well despite the Xmas silly season being well underway and a late night party that became a early morning party good progress was made.  This is my last weekend as the next two are out with holiday activities so definitely into the business end of getting this figure done.

Putty work
Repaint done
Both arms were glued on (using two part epoxy glue) and the gaps puttied up.  It’s a bit odd after a few months of seeing the figure without any arms.  He suddenly looks a lot squatter.  After 24 hours the putty was undercoated and again left overnight to dry.  I was a bit worried about trying to blend the new sections back in with the rest of the figure but it worked out to be easier than expected.  I think this was because both sides of the arms where the putty was were in the lighter sections and the highlighting up was easier than the shading.  I found that the first two coats of paint over the undercoat had to be thicker than normal but after than the blends were as normal.  Also I made sure when I was blending in the new section that I blended over some of the existing painted section as well.  This overlap would help hide the new paint work, as you will never get a paint mixture exactly the same as the first time you did it.

New wall
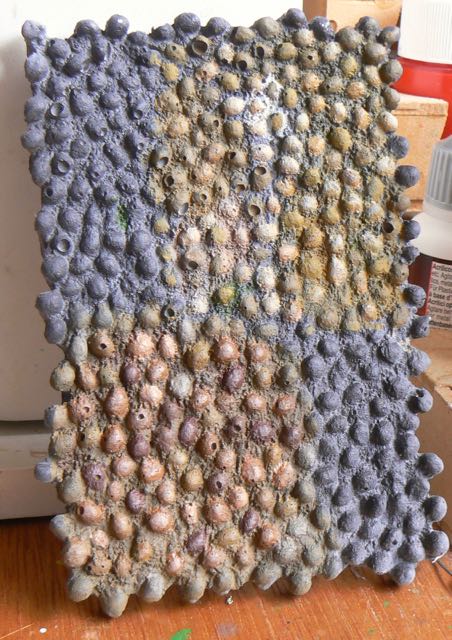
On the base I painted up the wall section much like my test piece from earlier.  On the test piece I also started trying out some oil paint blends and washes to see if that improved things much.  It did a bit, but I also want to do a little bit of pigment work too while I have the chance as the test piece and the real piece are very close.  I’m pretty much sold on always doing test piece for terrain bases going forward.

Many trials, lots of error
On the cobblestones still no luck.  Many attempts but all don’t really seem to work with the rest of the piece.  I’m currently trialling a very light dirt/mortar colour with the rocks being the same range of greys that make up the wall.  Hopefully next week I’ll get this sorted out.  Also I need to complete the naginata.

Sunday, December 6, 2015

54mm Samurai arms and Dungeon Saga homemade case

This week was arms, a wall and a whole lot of styrene card and glue fumes.

Arms
First up I worked on the arms of my 54mm Samurai.  Using my new green colour scheme of using VMC German Uniform Green as the shade colour (with some VGC Night blue for the final shades) for the Jade Green base coat worked a lot better.  The figure does have some limitations.  The arms have a pitted surface (deliberate, not bad casting) to represent a cloth texture.  However it just looks like someone stuck a pin in the putty while the figure was being made.  I know, I’ve done the same and this is exactly what it looks like.  Never a good look, just comes off as poor sculpting.  Odd as the gauntlets are really well done.  So it just detracts from the figure somewhat.

Glove love
The gauntlets I base coated in VMC Beasty Brown and shaded down with VMC Smoke.  The highlights were done in VGC Khaki and VGC Dead white.  I was really happy with the gloves.  I never get brown highlighting right but this time things came together and in a very small area (3mm x 3mm) I got some great blending and real contrast.  Pretty chuffed to be honest.

Next will be the naginata and then glue time and tidy up.  I might just make Cancon.

Base colours on the wall


At night I blocked out the base colours of the wall section using 4-5 different greys and some high impact (i.e. different from grey) colours.  After all the stones were done I did the pointing in VMC Tan Yellow.  My only problem is with so many greys when I was doing the second coat I’m pretty sure I mismatched the second coat compared to the original.  I’m going to call that deliberate as it add more variation.  Next step is to start the shading work and there are a lot of stones to do.  Gone are the easy days of 28mm terrain and the quick two stage dry brush.


Flat card + glue = box
Now that I have my Dungeon Saga kickstarter I need something to put all the figures in.  The game comes with a cardboard slip case and the wife mentioned I should make a box to go into the the slip case to hold the figures.  I needed something light so I got some 1mm styrene card and some styrene square tubing and made up a box to fit the slip case.  The square tubing is used in the corners and on the bottom as reinforcing.  I cut a hole in the front so you can put your finger in and pull out the tray.  Since these pictures I’ve undercoated the whole thing black ready for some final colour (undecided as yet).  Now I need to find room on the shelf to put it.
Like it was made for it

Sunday, November 29, 2015

54mm Samurai socks/sandals/green armour and basing trials

Well I got cracking for a few days, then work hit and knocked me out for a few days but I picked up over the weekend.  So in the end on par.

Skirts and sandals
So firstly I tidied off the green armour skirt and finished off the green shading and highlighting.  Need to work a bit more on the two small reliefs on the armour pieces as they are currently gold but look a bit muddy.  The moulding isn’t great however.

Secondly was the socks and the sandals.  These normally seem to be white or off white so I started with VMC Light Sand and shaded down with some VMC Smoke and highlighted up with VGC Dead White.  I did a number of glazes on the toe area and on the ankle bones to make them the whitest part of the sock as they would be stretched the most.  The sandal straps I did in VMC German Black/Brown highlighted up with lighter brown colours.

I didn’t get to do the diamond pattern on the back yet.  I’m thinking I will do the arms first before attempting this.  This is because if I muck it up, there will be a lot of rework to fix it up.  Not sure I have the time for that.  Plus I’m scared of ruining all that lovely shading work I’ve done :)

Wall trial
I haven’t worked much on the display base yet so I started some trials on both the wall section and the road section using spare pieces.  For the wall I’ve pretty much settled on using five different grey shades with off white/white pointing.  The grey rocks are in a random pattern to try and make it look like these are just random stones but they came from the same area/quarry.  I did a number of brown shades all over and some dark green (Coat d’Arms Russian Green) down the bottom as water seepage/slime.  That was looking ok but not good enough.  So I went back and using some glazes highlighted and shaded each rock to try and get some more variation.  The good thing here was that since each grey shade was quite close to the other it was a case of the highlight of one grey rock was the shade of the next lighter rock.  Once that was done some more brown glazes to blend things back together.  My idea was that each rock would have been a different colour, but all would have been in the wall for the same time so “dirty” effects should be constant over all the rocks.

For the rock pathway I started with a base of VGC Earth and then did a number of red brown/brown rock colours.  It looks ok, but doesn’t really match with the wall.  So I’ll need to try that one again with more greys.
Many trials, nothing usable

Finally my daughter started on her entry for the Cancon painting competition.  She likes the idea of painting but only likes to do 20 minutes at most and is a little intimidated by what I’m painting.  Ie what she paints doesn’t look like what daddy does so she feels like giving up.  So I need to push her a bit but don’t want it to become painful.  Also I forget she has never seen me paint much so hasn’t seen the progression of my figures that much.

So orange
Currently she is painting up one of the G scale gauge (1/24 - 75mm) figures I purchased off eBay of a seated lady.  Luckily my Dungeon Saga kickstarter came and has some nice benches that fit the scale quite well.  So it will be a lady in a park (read lots of railway scenic flowers) sitting on a bench.  Lets hope we get there.

Sunday, November 22, 2015

54mm Samurai one step forward, two steps back

New armour skirt colours
This week was a bit of going backwards to hopefully go forwards later.  I had another go at the lower green armour pieces.  These have small square recessed areas that I’m really struggling to get to look decent.  I tried base coating the entire piece again and having a go at shading with using VMC Hull Red as the shade colour to the Citadel Jade Green.  However it just didn’t look good.  The recessed areas make glazing near impossible as any wash/glaze pools in the recessed areas and the small size means the paint won’t stay on one side of the small recessed square area, but instead spreads out over the whole square due to the surface viscosity of water.

So I needed a different approach.  I decided to make the recessed squares a different colour, going with the purple of the main coat to tie the front and back of the figure together.  Also I went away from glazing the recessed areas and used old school army painter layering to build up the highlights.  I managed to get the shades in by holding the figure upside down the entire time I was doing the shade washes so they would dry in the right place and not spread out.  Also I didn’t worry about being too neat as once I had finished all the squares I redid the green areas to neaten things up.  It’s starting to get there now.  Next is redo (again) all the green shading/highlight and making sure I don’t get any seepage into the recessed squares.

Scabbard done again

I tried doing a diamond pattern on the scabbard but didn’t get it even enough.  So the entire scabbard had to be repainted.  I like the diamond pattern idea but will need to be more careful and accurate next time.  I’m also thinking of using a pattern of four small diamonds to create a larger diamond on the back of the figure.  The large back area needs something on it to fill in the blank space.

New belt
Other bits finished off was the horse hair on the helmet from last week and the waist belt.  For the helmet hair I kept alternating between adding dark blue for shades and shadows and dark brown glazes to keep the dirty animal hair aspect going.  I kept the grey highlighting very muted to avoid the “I dry brushed the heck out of this” look.  The belt I wanted something to break the dark breastplate from the tan of the skirt.  Also I wanted a bridge between the yellow lapels.  I went of a base colour of VMC Light Sand which was highlighted up with VMC Gloss White and down with some brown.

Next week will be finish the green armour, diamond patterns and sandals.  Then the arms can get glued on.  The race to get this done by January is on.

Sunday, November 15, 2015

54mm Samurai coat work, leg armour and hair

54mm Samurai
Most of my painting this week was on the kids go-cart painting “go fast flames” on the side with enamel paints and my old Paasche model H airbrush.  I learnt that it is much better to mask an area and then cut out a pattern with a hobby knife (which means you get nice smooth curves) than try and mask out a pattern with tape (which results in odd dead straight sections and wobbly curves).   Enamel paints are lovely in that you have ages for them to dry and can clean up any rough bits with some white spirit and a cloth.

On the samurai front I did some more work on the purple coat and tried to smooth out the transitions a bit more especially around the top of the coat where the highlights get more extreme and go towards white/pink.  I’m happy with the coat but will need to do some more work on it once the arms are attached and I can see where any extra shadows are needed.

The leg armour was next.  Seeing that these are very much in shadow under the armour skirt I started with a base of VMC Hull Red and shaded down with VMC German black/brown and a hint of VMC Midnight Blue.  This is because things get bluer as the light fades at dusk.  So for things in shade you normally add blue to the mix.  This is an area I need a lot more skill in.  I’m still in the simple school of colour mixing.  I notice when watching painting tutorials experienced painters mix a wide range of colours when highlighting and shading.  Half the time I’m questioning why, as the colour added can be totally different from the base colour.  Much learning needed there.

Better blends on the coat
For the leg armour highlights rather than go with the purple I used VMC Flat Yellow to try and give a more sun faded/worn look to the raised vertical slats on the armour.  That worked out ok.

Finally started (again) on the horse hair “hair” on the helmet.  I’m keeping with a brownish shade to keep things away from the land of grey scale that I tend to end up in when painting black/grey items.  I did try and highlight with a bit of yellow but the blue in the grey paint started to make things green.  So I need to try countering this by adding red.

This reminds me of painting books I read where grey is always mixed from colour opposites and black is always mixed from the three primaries instead of a pre-created (i.e. from the tube) grey or black.  I’m starting to see where this could be of value.