Sunday, June 26, 2016

Violinist diorama base work part 2

Halfway on the charred brown between the stones
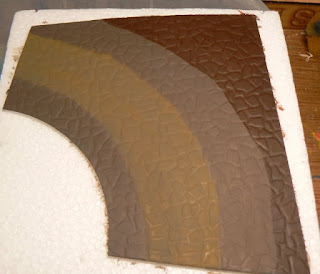
More base work.  I painted the paving stones and then repainted the space between the stones a few times (in VGC Charred Brown) to get the colour solid.  I made a lighter colour area on the pavers to represent the walkway area.  The further away from this area, the darker the paving stones.  I randomised the colours but with a lighter range of colours in the walkway and a darker range of colours away from this area.  I then did a few glazes with darker colours (burnt umber, browns) in the back section of the paving area and lighter glazes (yellow/tan) over the lighter coloured walkway area.  Finally I did a few oil washes to try and break up the uniform colours of each paving stone.

Still glossy as the oil wash dries off
For the brick wall I base coated the entire wall in VMC Hull Red.  To break up the wall I then mixed Hull Red with a number of other colours to make each brick slightly different.  The entire wall is still red, but a nice variation of the base red.

Wall and fountain
I painted in the grout lines between the bricks in a mix of VMC Tan Yellow and VGC Khaki.  By the end of that my eyes were seriously going sideways.  Before going further with the shading I put the fountain onto the wall.  As the wall was an uneven surface I used Milliput to block up around the edges of the resin fountain.

Successfully cleaned and polished
Having waited one week I sanded my test water pond that I had done with Liquid Gloss.  I went all the way from 180 grit to 2000 grit and finished off with a buffing wheel.  Good news is that I can get back to a totally clear finish.  So my idea of cutting off the meniscus and then sanding the cut area back to a smooth finish looks like a workable solution.

Starting the main base
Finally I glued on the foam to the wooden base getting ready for doing the water pond on the main piece.  I’ll coat the area in Milliput to make it water tight and to make a curve at the bottom of the wall to make it more ‘pond like’.

So next week the slow prep work on the water area and some more wall painting.  Maybe I’ll even sneak in a start on the real figure.

Sunday, June 19, 2016

54mm Violinist diorama base work

Base red bricks.  The fountain goes where the black is
More base work this week.  I finished up the sides of the wall section and finally got some paint on it.  I’ve done another small trial and I think I have the red bricks worked out.  I’m going to use a tan yellow colour of the grout as I was finding the white I used previously a bit too stark against the red.

New trial on the right
I am going to have a small water feature in the front corner of the piece.  Kind of a pond I’m thinking.  I’ve started trialling a few water effects.  First up was my old friend Liquid Gloss.  I used this two part resin previously and it worked well on my river boards.  I did a quick trial to see if it reacted with the foam I’m planning on using.  The one problem I know I’ll have is the meniscus on the mold sides.  I popped my test piece out of the mold after one day and was able to trim the meniscus off very easily.  After one day the resin has set but the edges are still soft and can be cut with a knife.  Now  I need to wait a few more days to see if I can sand the area where I trimmed and get it nice and smooth (and clear).

Liquid Gloss trial
I tried the Vallejo Still Water next.  However like a number of people it cracked while drying.  This was in a paint mix tray so there was no leakage to cause the cracking, and I was less than 3mm in depth.  Ie used exactly as directed.  The issue seems that the edges, being thinner, dry first while the centre is still ‘wet’.  Perhaps if it was an even depth then it would be ok?  However for the fountain bowl this product isn’t going to be suitable given the curved nature of the bowl.

I’m also trying the Woodland Scenics water Water Effects (I have a small amount from one of their school diorama kits.  Will have to see how that goes.  However the product never fully dries and items placed on top will indent.  This makes me think after a year the top of the water area will be covered in dust that has settled into the water.

Pre-shading pavers
I also pre-shaded my paving stones.  Each stone will be coloured individually but I’m trying to get some distinct areas.  The pre shading will help with this, hopefully.

Monday, June 13, 2016

A little side trip to WW2 in 1/35

Base coats and ugly
Much better
Needing to paint a person rather than scenery I painted up another of my 1/35 Tamiya German 37mm AT gun crew member.  I even got to use my helmet decals (which I forgot to do on the first guy) which after some weathering looks quite good.  When applying decals I’ve learnt that it really pays to do a coat of gloss varnish first.  Also using decal softener helps a lot.  Once the decal is dry I applied a coat of matt varnish before continuing on with the painting.  It’s also quite easy to paint a figure when you know what you are doing, rather than spending hours experimenting (and failing).


Pretty helmet decal
My wall section continues to give me grief.  I did another dry fix an found the wall was off just a bit too much.  The short side wasn’t quite square to the back wall so I had to rip it off and sand the side down.  This was of course after undercoating the whole thing of course.  Really over this wall.

I’ve been thinking about the ground cover and the large cobblestones I was going to have under the fountain.  I’ve decided I don’t like the cobblestones as they look too big and rough.  So instead I thinking I’m going to go with the paving styrene sheet I used for the 54mm Samuari wall.  I then had a very frustrating few hours trying to get a paint scheme that worked.  Finally managed to get one based around VMC Golden Brown, VMC Khaki Grey, VMC Charred Brown and glazes with of VMA Burnt Umber and VMA Mahogany.  I found I need the brown/red glazes to tie the colour of the ground back to the red bricks I will have on the wall.  Also a number of glazes adds a bit of volume and depth as the styrene sheet pattern is quite flat.

Paving in action
So the wall is currently drying after another glue up, tomorrow to be puttied and sanded.  I’ve cut out the paving sheet to size and will undercoat that next.  I also need to start some water effects trials for the fountain.  I’m not happy with the slow progress rate but with everything taking 2-3 trials first it is what it is.

Sunday, June 5, 2016

Two steps backwards

New wall
Big sigh this week.  After looking at my wall from last week (after many hours of putting together, sanding, gluing, etc) I realised that the brick line wasn’t level.  When sanding I had sanded the blocks of bricks at an angle.  All together resulted in the top two sections being at an angle.  Not much, but enough to make it look wrong.  So that went in the bin and I got to do the work all over again.  Ie from the casting of the brick sections, sanding (with more care) and gluing and putty work to fill in the gaps.  So I’m back to where I was last week.

Wooden backing core for the resin wall pieces
Fence and railing
I finished off the fence section.  I used VGC Tinny Tin and VMC Dark Sea Blue as the base coat for the metal railing.  I find the dark sea blue very good at removing the excessive glitter from metallic paints but still leaving the metallic colour.  This was highlighted up with brass and silver and shaded down with more dark sea blue and black.  For the sandstone section I used some Coat d’arms Russian green as a glaze around the bottom to add some wet slime look.  I also used some VMC Hull Red and Charred Brown to make the rust stains around where the metal joins the sandstone.  This was highlighted up with some orange.

Rust railings
Although I liked the last box I did, it was too big.  So I made another box and painted it up.  Getting a bit over painting wooden boxes I must admit.

Another box
So the wall is almost ready for undercoating.  Before I do that I will find out where the fountain will go as all those bricks will obviously be hidden by the fountain.  I also have to work out what I’m going to do with the cobblestones in front of the brick wall.

I think I might have a break from this project as all the boxes and walls are giving me white line fever.  Might need to paint an actual person figure (like one of my WW2 Germans) for a bit to rediscover some of the joy of painting instead of the diorama grind.