Monday, January 26, 2015

Cancon 2015

Well I survived Cancon with two small people but it wasn’t easy.  3yr olds don’t sleep well in strange hotel rooms.  I went to three painting classes on the Saturday and two on the Sunday.  I’ve never been to a painting class so was a bit unsure of the format.  But they happen pretty rarely so I went in as many as the family would cope with.  Most of the techniques I knew about and had trialled sometime in my life, but seeing them done well by someone who knows what they are doing make a huge difference.  With El Torres I kind of taught myself glazing through trial and error, but having someone else show me how much they dilute paint (which was way more then thought) was great.  I liked the speed of two brush blending but I’m not sure on it over glazing.  Plus licking all that paint did leave a strange taste..

I entered El Torres in the painting competition but missed out.  Talking with one of the judges afterwards I got a number of good pointers.  Most of them tied pretty much directly back into the classes I had attended :)  More contrast, more washes, more ground elements on the base.  Good news is I managed find another 54mm figure in the bring and buy so I’ve got a few options for next year (or maybe even wintercon).  Also most of my items I took to the bring and buy sold.

But now onto the best part of a post convention blog entry, the swag bag…


DBA version 2.2 $10 - always wanted a copy (I first played 1.0 when it came out) and didn’t really want to pay $50 for the new 3.0 version.  It matches up with HoTT 2.0, which the wife plays, so now I can buy those 28mm romans and not feel guilty.


Main Event wrestling $1 - no idea, but I can’t go past a $1 game.  You only have to play it once for it to pay off.  Failing that I get a zip lock plastic bag at least.


Fight City $3 - The Cheapass games are usually pretty good and at that price why not.


GW spider set $4 - for use in dioramas


Small dog by Eureka $1 - 28mm dog, he’s going into the next Dark Age village


Tribal Warrior (orc) $20 - A cancon release for Twelve Elements of War.  A nice looking resin figure who is 40mm tall.  Something different to try.


Allied Vehicles accessory set $5 - some bits missing but much better value than the $15+ retail price.  I’m pretty sure I’ll keep doing the odd 1/35 scale items so things like this are always good.


Lots of Fernvale Scenics terrain - well this was going to be a terrain blog, so I need some more bits :)  Just like the durability of the resin so I picked up two long (flexible) hills, a mid size rock formation and the Oasis.  The rock formation wasn’t anything I couldn’t make myself, but the resin is just going to last so much better over something made from foam (like my old LoTR stuff).  Also when the pieces cost $5-10 each, I’m in.  The oasis I wanted after my last one was ruined by the awful water effect pellets I used.  I also got a small rock formation for free when the owner saw me with the kids.  Seeding the next generation of customers.


MA-19 Albericus, prince of Novograd $10 - a 54mm knight by Soldiers, from Italy.  The figure is helmeted which isn’t great but at $10 I need all the practice 54mm figures I can get.


25mm Hex bases $2 - Last time I wanted hex bases, no one had them.  Now I find 20 of them for $2.  Into the stock pile.

I resisted all the old $10 war-games that needed a good home, I have enough of those now.  Also hats off to the MOAB crew for running the Bring and Buy.  It's always a highlight of the experience.

Sunday, January 18, 2015

Degra El Torres is done

Almost like a real one
I made it, with just under a week before Cancon (although the last two weeks were pretty easy).  It was just the last few pieces done this week.  First a light varnish with Vallejo Matt varnish.  I use an airbrush to do all my varnishing now and can’t recommend it enough.  No more rattle can and speckled finishes and frosting from old cans.  Also $5 for a small bottle of varnish is a lot better than the $25-30 for a spray can and lasts longer.


Once the varnish was done I did some more dust work on the boots and lower legs with some pigments to add to the dust washes already done.  I also added some more rust pigments to the tongs.

Unable to stop fiddling I redid some of his face, mainly the forehead.  It just was a bit too plain.  I’m not 100% with the result but had to stop as things are getting lumpy due to all the repaints done.


Then it was on to gluing.  I used PVA glue for the smaller items and polystyrene glue to attach the figure to the modelling foam.

Lastly was the brass plaque.  After a few nights of playing around with the Dremel and some brass strips I was getting better at engraving, but not good enough.  The low quality of the engraving would be a bit distracting to the overall finish.  So off to Mister Mint and $20 later I was all done.  This makes the plaque cost more than the rest of the piece combined.  I also found Mister Mint have gone high tech and don’t do the engraving by hand.  Instead they have what I assume to be a little CNC machine which they just type in the text, select the font and size of work piece and everything is done by machine.  Great of the end consumer but a little sad as one more skill is lost from the workforce.  I glued the brass onto the wooden base with some two part epoxy.


I’m a bit out of sorts now.  Happy El Torres is done, but still wanting to do better.  I have a number of other things to look at (finish the Doom figures, some figures for Saga, 1/35 scale german AT gun, the banshee bust, 54mm Pegaso figure) but I think I will wait until after the painting classes at Cancon to see what to do next.  Maybe some 28mm Saga figures just to keep things ticking over as they are pretty easy to do.

I also have to consider do I keep doing two streams of painting, one ‘churn and burn’ army stuff and the other high detail work?  But the army level is starting to loose it’s appeal.  I feel I’ve painted enough armies and maybe will just finish off the few remaining ones I have (LoTR elves, few saga bits).  Mind you I said that a few years ago when I was coming to the end of the LoTR figures and then went out and purchased two armies for the then new Saga game.  After all everyone knows that you die when you paint your last figure.

Sunday, January 11, 2015

El Torres near the end

Ready for a display base
Bit of a quiet one this week.  There was some fiddling around on El Torres as I redid the spot highlights on the front breast plate armour (again) and smoothed out the shading transitions.  After reading one of the painting guides in issue 20 of Figure Painter Magazine (a great magazine) I added a 5 o’clock shadow to the face.  I also added some black washes around the rivets on the armour to try and make them stand out a bit more.


All this fiddling did however result in a few mistakes that then took almost as long again to fix up.  So I’ve pretty much had to say no more so I don’t ruin things.  However what I would really like to do is varnish the figure and then start playing with some oil washes.  My intent was to do a trail figure before El Torres and the Pegaso figure I have but with time constraints and trying to get something ready for Cancon I had to go with El Torres off the bat.

Ready for a figure
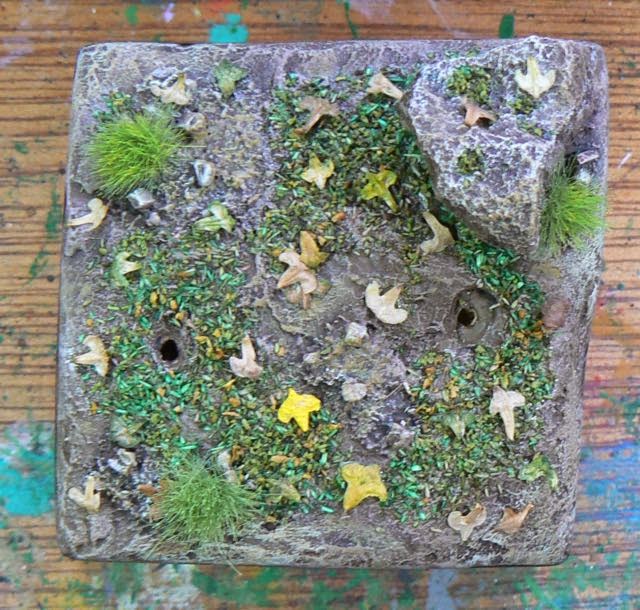
The base is also finished.  I added the extra grass tufts and painted those.  I also added a few birch seeds acting as leaves.  Insanity is gluing individual leaves and taking serious consideration to the orientation of each leaf.  The old days of PVA glue and dip in flock are gone.

Those leaves never seem random enough
So what is left?  Just a light varnish coat and to glue everything together.  Due to rainy weather I didn’t get the varnish done this weekend so that will be next week.  Then the glue together of all the bits and final photos :)  I already have a carry case (actually an old baby milk powder tin) sorted out and have predrilled some holes in the bottom of the display plinth to attach the whole piece to the tin.  That way it can safely be transported.

Sunday, January 4, 2015

Small scale diorama work on El Torres display plinth

This week I concentrated on getting the display plinth underway as Cancon 2015 is only a few weeks (and more importantly a few weekends) away.

I started by gluing on a square piece of foam on top of the plinth and left it to dry overnight.  Then I rough outlined what I wanted the shape of the ground to be like and carved/hot wire cut away the foam until it was near to what I wanted.  Following this I sanded down some of the bumps to get the contours smooth.

Carved foam and rock glued in
I had previously experimented with different coverings for foam (plaster of paris, polyfilla, plaster bandages, texture paste) and went with polyfilla.  I wanted to get the sides of the foam very smooth so when painted you wouldn’t see any bumps or lumps.  Also I wanted to protect the foam from getting dented when handled.  Since you can sand polyfilla and it is flexible (an issue with plaster is that will crack easily on thin coats) it seemed like a winner.  So a few coats and some 400 grit sand paper and the sides were looking quite nice.  I made the top quite rough to simulated the ground texture.

So black - the sticks are where the figure will go
I originally painted the side in a flat black, but the minor imperfections in the surface showed up.  Luckily my old Reaper Gloss Black paint was still usable and that comes up a lovely finish.  3-4 coats and you have a great even semi-gloss finish that hides all the bumps in a flat surface.  Doing things a second time I would have just boxed in the foam with some plastic card and painted that.

For the terrain originally I wanted to have a small broken column (which the shotgun would rest on) which I wanted to paint in a sandstone like effect.  However due to the rough texture on the column (which made doing washes impossible) and my lack of skill I just couldn’t get what I wanted.  Perhaps a few more tries with the airbrush and really thin layering might have got there but I just was burning too much time.  So instead I grabbed a rock from the garden, clean it up and glued in in place.

Most of the dry brushing done
The colours are my usual 28mm basing ones.  VGC Earth washed down with AP Strong Tone.  Then a few layers of dry brushing with VMC Pale Brown and VMC Iraqi Sand mixtures.  On some bits I went up a lighter shade with the Citadel Bleached Bone.

Once the colour was set I added some scatter material and some grass tufts.  I still need to paint the grass tufts as real grass isn’t a uniform colour.  You need to add some yellow/bright green/brown normally.  Also I will add some leaves and perhaps a few reeds pretending to be high weeds.  The key is to add lots of diversity and height diversity just like you see in the wild.

Scatter and grass added
Once all the ground pieces are done it will be time for final alignment and varnish time.