Sunday, November 30, 2014

El torres and Doom figures update

He should really wipe
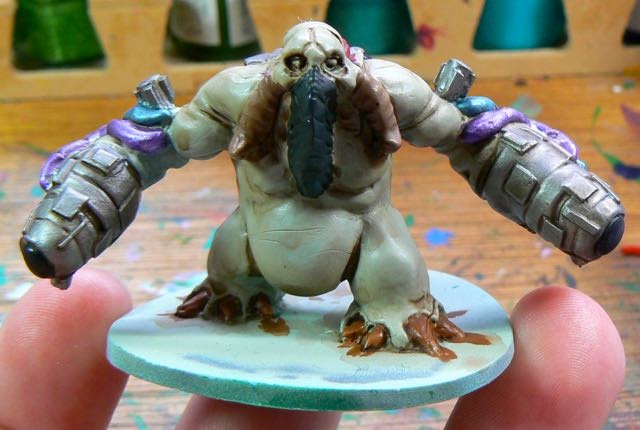
Over the last week or so I’ve been working a few projects.  First up is the slowly progressing Doom figures.  The Mancubus figures have now had all their base coats done.  I decided to use some of the various metallics I have as painting mainly Dark Ages figures you don’t have much need for metallics outside of chainmail.  Plus the paints are all starting to go hard.  With all the base coats done I experimented with a coat of AP Soft Tone.  I will probably go for another layer of either strong or dark tone on the gun arms.  Then the final highlights.

Hard to pick your nose with those hands
For the El Torres base I have some broken column resin pieces (from Secret Weapon) which I though would be more interesting than the original table idea.  I have about a dozen pieces (they came in a set) so I tried a few different marble type effects.  However the columns are not smooth, but rather very coarse.  So all the heavy wash technique most people use for marbling didn’t really work.  The washes kept running into the cracks.  Instead I might try and paint them as sandstone which would suit the texture of the column better.

The un-shaded armour looks quite bad now
On El Torres I have been working on his face, collar (last week), pants, boots and shirt (this week).  The pants have worked out very nicely and I’m quite happy with the result.  My dark to light colours were

VGC Beasty Brown
VGC Leather Brown
VMC Golden Brown
VMC Tan yellow

For the purple socks I used

VGC Black
VGC Hexed Lichen
VMC White

The pant studs were done in Citadel Gun Metal.


For the boots/shirt my dark to light colours were

VGC Black
VPA Shadows Flesh
Citadel Blood Red (the very old tall hexagonal bottles range)
VGC Orange Fire
VGC White

For the green shirt puffs I’m not 100% on them yet.  The silver buttons don’t work.  Colours were

VGC Black
AP Angel Green
VGC Dark Green
VGC Sick Green
VGC White

I might try and redo the silver in a gold to tie that area back to the pants.

The face was

VPA Shadow Flesh
VMC Medium Fleshtone
VMC Dark Flesh

The collar was Citadel Bleached bone shaded down with VGC Earth and highlighted up with white.  All those frills and folds took a long time to get done.  I did the face first as I needed that to be right before going further.  If the face is wrong on this scale, the rest of the figure is pointless.

So now I have the ammo strap and the armour to do.  I think I will do the smaller arm and leg armour pieces first to see if my chosen technique works in the larger 54mm scale.  Plus that large breastplate is intimidating me a bit.

Sunday, November 23, 2014

Airbrush general equipment

In an effort to give people an idea of some of the extra equipment and costs (in AUD) of getting setup with an airbrush I've made a quick tally of some of the extras that I have purchased.  Like many tools none are essential but most make things easier.  For pretty much all of them I would recommend eBay as a source of supply, especially on the disposable items.

* Glass cleaning pot - $15-20


When cleaning out your airbrush between colours you need to spray some cleaner/water/etc through it.  Rather than spary that into the air and contaminate the piece you are working on you instead spray into this heavy glass pot.  The lid has a filter on it so the paint/cleaner stays inside.  The pot also doubles as an airbrush holder.  Recommended.

* Cleaning brushes - $5


Usually sold as a set of different sizes these are small brushes to clean out your airbrush.  I don't use mine much now that I use q-tips, an old toothbrush and paint brush instead.

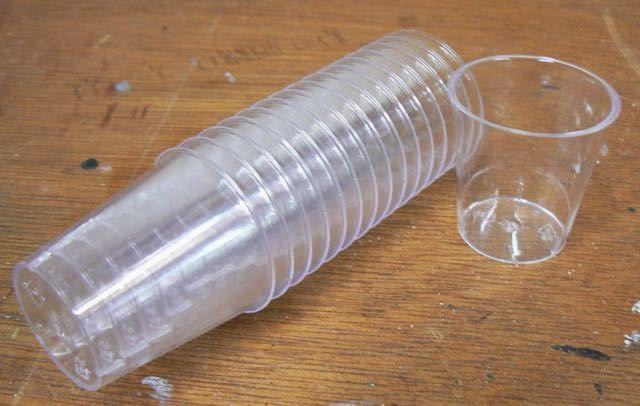
* Disposable mixing pots - $2 for 40


The clear plastic shot glasses sold in grocery stores make great mix pots.

* Q-tips (ie the things you clean your ears with)


I find these very good for cleaning out the paint cup and needle of my dual action airbrush.  They absorb the last traces of paint that always seems to be left in the bottom of the paint cup.  Buy decent ones as the cheap ones come apart and leave bits behind which will block up the airbrush nozzle.  Yes, this is the voice of bitter experience.

* Quick connector - $2-3


Handy as you can disconnect your airbrush without draining your air tank.  That way you can do a full clean or swap airbrushes.  For a dollar or two more you can get ones with a small screw dial that limits the air flow too.

* Plastic pipettes - $2-3 for 20


Great for mixing and adding water/thinner/etc into the paint cup.  At art stores I saw them for $1 each, so another item where ebay is the winner.

* Airbrush holder - $10-15


These have mounts for both normal gravity feed dual action airbrushes and other types with side cups.  Now that I have the glass spray pot I don't use this anymore except when I'm using my Paasche Model H.  Some models clamp onto a bench, others are free standing.

* Needle oil - $5


If you are going to buy a decent airbrush, best to look after it.  A drop or two of oil every few sessions is all that is needed.

Sunday, November 16, 2014

Doom figures and El Torres

Mancubus needs some Fitness First time
Been a quiet week on the painting front.  I started on the six Mancubus figures from the Doom boardgame late in the week after undercoating the figures and doing some preshading.  So far all I have done is the basic flesh and the start of the details (guns, claws, nose).  I went for a light green/grey look which I then highlighted by added more grey and white to the mix.  All these colours were airbrushed to save time as the figures bigger than a normal 28mm figure.  Hopefully over the next week or so I will finish of the base colours and start the washes.

The big belly undead
The Doom zombies were finished off.  These were another quick and dirty "three colours with washes and highlights" job.  For the twelve figures I did 4 each in blue, brown and green jackets just to add some variety.  Even on Mars you need safety orange stripes on your clothes :)


After staring at El Torres for the week I finally got started and got the base colours down.  The green will change as the current green is just the under layer as the final green I want to use doesn’t work over white.  It’s just too thin.  The armour also just has the black preshade so far.


Using a similar scheme to my recent Wood elves I put down all the initial colours.  I find I need to have all the white covered before I start painting further.  I see a lot of online pictures where other painters work on one part to completion and leave the rest of the figure undercoated.  I find that  throws off my colour sense (what little I have).  Just too orderly in my ways.


I’m pretty happy with the colours and really like the light purple next to the golden brown on the legs.  I might change the boots as they are the same colour as the shirt which may be too much sameness in the figure.

In parallel I will also been thinking about the base.  My initial plan is to make a diorama where he (El Torres) is next to a table or something similar with some food on it and his shotgun is resting on the table as well.  Like he is waiting for someone, but waiting in the open.  His facial expression is one of world weariness and I want to align to that.  I recently got some 54mm scale food items and plates which I think will work well.  Of course it’s going to help if I get the figure finished first.

Sunday, November 9, 2014

True Metallic Metals (TMM) tests and El Torres by Degra.

After my NMM test piece I wanted to try out TMM (True metallic metals) or to put simply painting metallics with metallic paint, but with shading.

Old school flat pack figure
My first test piece was an old Julie Guthrie Grenadier figure.  A fully armoured knight so lots of metal there. Originally I was going to use VMC metallics but found the mica/sparkle particles in them to be quite visible in the VMC Gunmetal (72.054).  Remembering I had the army painter metallics (I had won the complete Army Painter range last year) I got them out to have a look.  I found them to be excellent.  So smooth in colour.  Much better than the rest of the AP range which I find to be rather thick.  The only negative was that there wasn’t a huge differentiation from the dark Gun Metal to the light Shining Silver.  To add to the colour spectrum I also purchased VMA Black Metal (71.073) and VMA Aluminium (71.062).  However I still find the VGC Silver to be brighter.

I base coated the figure in AP Gun Metal and shaded down with the Black Metal and all the way up to VMC Silver.  I got a really nice smooth transition especially on the larger shield.  However all that shiny metal means you don’t really see the difference.  In 28mm the paint job looks better than the usual paint/wash/dry brush highlight but not by much.  There is just too much light reflection.  The lower the light the better you can see the blending from near black to silver.  But in normal light not so much.


The feet are a bit miscast
 My second test piece was from Eureka and their Conquistadors range (part 100CON01).  Originally I went for a very heavy black lining over most of the figure.  That was too harsh and I toned it down by painting over it.  Given the translucent nature of metallic paints I went for a higher number of layers on the highlight.  From other people’s examples I also really tried to ‘pop’ the highlights to an extreme.  Most tutorial have the majority of the figure in darker gun metal hues and then go for a more extreme highlight in silver to mange that.  I tried that and it worked better.  My blending on the first figure is better, but the end result (i.e. you can see that there is shading) is better in the second.  The heavy highlighting there helps.


Get in my belly!
Silly detail levels
Next up will be a figure I got from The Combat Company, Degra
Miniatures - 54mm El Torres.  He was the reason I did all these metallic tests as he has a very large breastplate.  Given the larger scale I’m hoping the smooth blending I did in the first figure will work better given the larger area.  The figure has a crazy amount of detail and really shows what you can get out of a resin figure.  I have to admit I’m a little nervous and I’m not sure my skills are there for a larger complex figure.  But when failure looms, you can always undercoat again.

Sunday, November 2, 2014

Eureka milking set, Conquest Games Normans and something special

I have finally finished the Eureka milking set, just in time for it to be released.  To jazz up the base I added a small wood stack and some rocks/flowers/grass as usual to break up the large expense of unbroken ground.


I really do like the faces of the milking woman and the boy.  Both dreaming of a better life…away from the cows.


On the WIP front I have put together the 7 Normans from Conquest games which I will be using for the Flemish swords for hire.  The figures aren’t as well armoured as the official versions but I play social games so I don’t think anyone will mind.


The figures went together reasonably well but I found the arms a bit annoying.  The arm socket in concave and sometimes the top of the arm piece is a bit flat so the join isn’t too good.  It hides the joint but doesn’t always result in a good join surface.  When in doubt add more glue and blow to speed up the drying process.  The odd man out is from the Eureka Dark Ages range and seems to fit the part, even if he is a bit on the short side.  I’m sure the other 7 guys respect the diversity he brings to the group.

Dapper Dan
Racing stripes
Finally something that makes painter dads proud.  I purchase some architectural models for my kids (6 and 3) to paint.  The 6 year did pretty well (having been painting since 3 years old), but then started to embellish.  I’m sure pink and green skirts will be back in fashion as some stage.  The 3 year old was more of a study in wet on wet blending technique.